JavaSE

本文最后更新于:1 小时前

# Java

# 多线程

# 线程同步

  1. 实现进程同步的三种方法
  • 同步方法
  • 同步代码块
  • ReentrantLock(JDK5.0 新增)
  1. 三种方法的推荐优先顺序(从性能考虑)
  • ReentrantLock > ** 同步代码块 ** > 同步方法

# Java 常用类的概述

# 字符串相关的类

# String

# String 类的基本概念

1
2
3
4
5
6
7
8
9
10
11
12
13
14
15
16
17
18
19
20
21
22
23
24
25
26
27
28
29
30
31
32
33
34
35
36
37
38
39
40
41
42
43
44
45
46
47
48
49
50
51
52
53
54
55
56
57
58
59
60
61
62
63
64
65
66
67
68
69
70
71
72
73
74
75
76
77
78
79
80
81
82
83
84
85
86
87
88
89
90
91
92
93
94
95
96
97
98
99
100
101
102
103
104
105
106
107
108
109
110
111
112
113
114
115
116
117
118
import org.junit.Test;

/**
* @author DzcGood
* @date 2021/8/28 - 23:03
*/

/*
* String类的使用
* */
public class StringTest {
/*
* 1、String:字符串,用一对""引起来表示
* 2、String是声明为final的,不可被继承
* 3、String实现了Serializable接口:表示字符串是支持序列化的
* String实现了Comparable接口,表示String可以比较大小
* 4、String内部定义了final char value[]用于存储字符串数据
* 5、String代表一个不可变的字符序列。简称:不可变性
* 体现:当对字符串重新赋值时,需要重新指定内存区域赋值,不能使用原有的value[]进行赋值
* 当对现有字符串进行连接操作时,也不能在原有value[]上进行拼接
* 当调用String的replace方法修改指定的字符或字符串时,也必须重新指定内存地址赋值
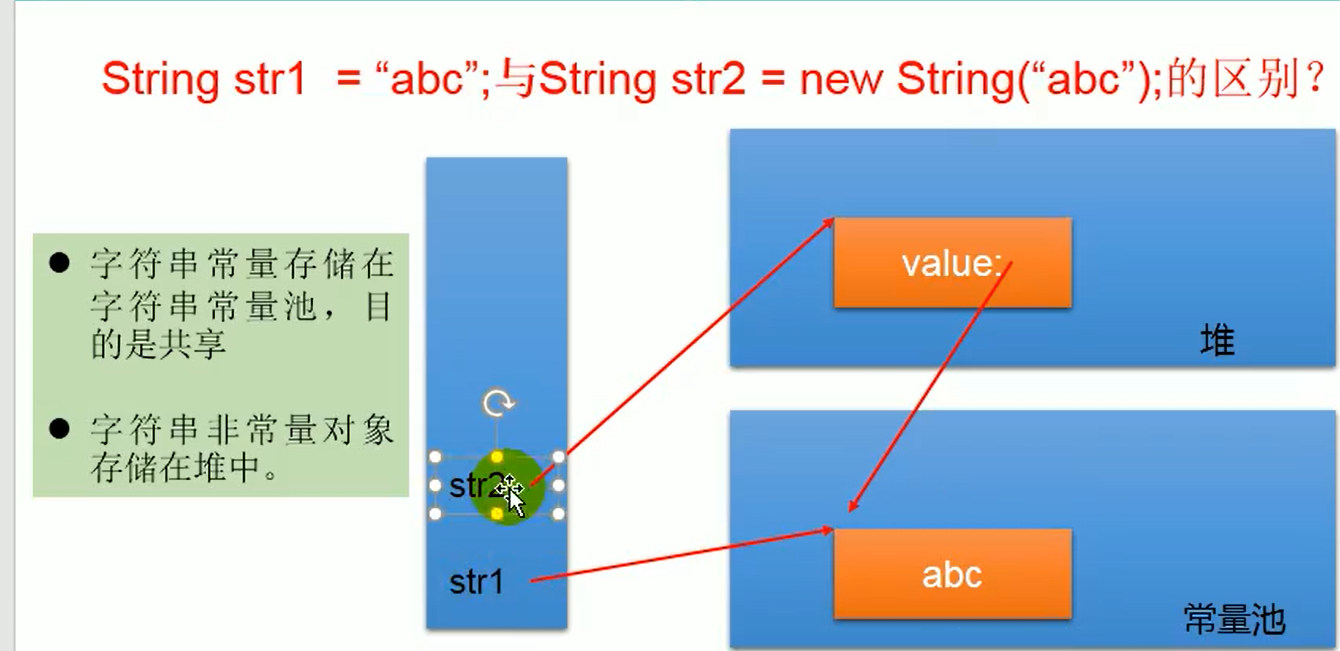
* 6、通过字面量的方式给字符串赋值(区别于new Sting的方式),此时的字符串值声明在字符串常量池中,
* 字符串常量池是不会存储相同的内容的
* */
@Test
public void test1(){
String s1 = "abc";//字面量的定义方式
String s2 = "abc";
System.out.println(s1 == s2);//true, "abc"保存在方法区的常量池中
s1 = "hello";
System.out.println(s1);//hello
System.out.println(s2);//abc
String s3 = "abc";
s3 += "def";
System.out.println(s3);//abcdef
System.out.println(s2);//abc
String s4 = "abc";
String s5 = s4.replace('a', 'm');
System.out.println(s4);//abc
System.out.println(s5);//mbc
}

/*
* String的实例化方式
* 1、通过字面量的方式
* 2、通过new + 构造器的方式
* */
@Test
public void test2(){
//通过字面量的方式,此时的s1和s2的数据hello声明在方法区的字符串常量池中
String s1 = "hello";
String s2 = "hello";
//通过new + 构造器的方式,此时的s3和s4是保存的地址值,是数据在堆空间中开辟的对象的地址值
String s3 = new String("hello");
String s4 = new String("hello");
System.out.println(s1 == s2);//true
System.out.println(s1 == s3);//false
System.out.println(s1 == s4);//false
System.out.println(s3 == s4);//false
//**************************************
Person p1 = new Person("Tom", 12);
Person p2 = new Person("Tom", 12);
System.out.println(p1.name.equals(p2.name));//true
System.out.println(p1.name == p2.name);//true,因为是使用字面量的方式声明的字符串
//**************************************
Person p3 = new Person(new String("Tom"), 12);
Person p4 = new Person(new String("Tom"), 12);
System.out.println(p3.name == p4.name);//false,因为是使用new + 构造器的方式声明的字符串
}

/*
* 结论:
* 1、常量与常量的拼接结果在常量池,且常量池不会存在相同内容的常量
* 2、只要其中有一个是变量,结果就在堆中
* 3、如果拼接的结果调用intern()方法,返回值就在常量池中
* */
@Test
public void test3(){
String s1 = "javaEE";
String s2 = "hadoop";
String s3 = "javaEEhadoop";
String s4 = "javaEE" + "hadoop";//常量 + 常量,结果在常量池
String s5 = s1 + "hadoop";//变量 + 常量,结果在堆
String s6 = "javaEE" + s2;//常量 + 变量,结果在堆
String s7 = s1 + s2;//变量 + 变量,结果在堆
System.out.println(s3 == s4);//true
System.out.println(s3 == s5);//false
System.out.println(s3 == s6);//false
System.out.println(s5 == s6);//false
System.out.println(s3 == s7);//false
System.out.println(s6 == s7);//false
String s8 = s5.intern();//返回值得到的s8使用的是常量池中已经存在的"javaEEhadoop"
System.out.println(s3 == s8);//true
String str = "hello world";
final String str1 = "hello ";//str1是常量
String str2 = str1 + "world";
System.out.println(str == str2);//true,因为str1加了final,所以是常量!!
}


public void change(String str, char[] ch){
str = "test ok";
ch[0] = 'b';
}
/*
* 一道恶心的面试题
* 考察String的不可变性
* */
@Test
public void test4(){
String str = new String("good");
char[] ch = { 't', 'e', 's', 't'};
change(str, ch);
System.out.print(str);//good
System.out.println(ch);//best
}
}
# String 类的常用 API
1
2
3
4
5
6
7
8
9
10
11
12
13
14
15
16
17
18
19
20
21
22
23
24
25
26
27
28
29
30
31
32
33
34
35
36
37
38
39
40
41
42
43
44
45
46
47
48
49
50
51
52
53
54
55
56
57
58
59
60
61
62
63
64
65
66
67
68
69
70
71
72
73
74
75
76
77
78
79
80
81
82
83
84
85
86
87
88
89
90
91
92
93
94
95
96
97
98
99
100
101
102
103
104
105
106
107
108
109
110
111
112
113
114
115
116
117
118
119
120
121
122
123
124
125
126
127
128
129
130
131
132
133
134
135
136
137
138
139
140
141
142
143
144
import org.junit.Test;

import java.io.UnsupportedEncodingException;
import java.util.Arrays;
import java.util.Locale;

/**
* @author DzcGood
* @date 2021/9/8 - 11:17
*/

/*
* String类常用API
* */
public class StringMethodTest {
/*
* 较高频率的方法
* */
@Test
public void test1(){
String s1 = "Hello World";
System.out.println(s1.length());//length()
System.out.println(s1.charAt(0));//charAt()
System.out.println(s1.isEmpty());//isEmpty(),返回str.length() == 0
String s2 = s1.toLowerCase();//toLowerCase(),返回新建的小写值
System.out.println(s1);//s1的值没有改变(不可变性)
System.out.println(s2);//hello world
String s3 = s1.toUpperCase();//toUpperCase(),返回新建的大写值
String s4 = " he llo world ";
String s5 = s3.trim();//trim(),返回去除首尾空格后的字符串值(中间的空格不去除)
System.out.println(s3);//s3本身不改变
System.out.println(s4);
System.out.println(s1.equals(s2));//equals(),判断字符串是否相等
System.out.println(s1.equalsIgnoreCase(s2));//equalsIgnoreCase(),判断字符串是否相等,忽略大小写
String s6 = "abc";
String s7 = "def";
String s8 = s6.concat(s7);//concat(),效果和 + 一样
System.out.println(s8);//abcdef
System.out.println(s6.compareTo(s7));//compareTo(),字符串比大小
System.out.println(s1.substring(0)) ;//substring(int index),取从index开始的子符串
System.out.println(s1.substring(0,2)) ;//substring(int start, int end),取 [start, end) 的子符串

}

//
@Test
public void test2(){
String s1 = "hello world";
System.out.println(s1.endsWith("world"));//endsWith(String str),判断字符串是否以str结尾
System.out.println(s1.startsWith("he"));//startsWith(String str),判断字符串是否以str开头
System.out.println(s1.startsWith("He"));//false,区分大小写
s1.startsWith("ll",2);//startsWith(String str, int index),判断字符串从index开始是否以str开头
String s2 = "wo";
System.out.println(s1.contains(s2));//contains(String str),判断字符串是否包含str
System.out.println(s1.indexOf("lo"));//indexOf(String str),返回字符串第一次出现str的索引,没有则返回-1
System.out.println(s1.indexOf("ll", 1));//indexOf(String str, int startIndex)
// 返回从startIndex开始的str的索引,没有则返回-1
String s3 = "hellorworld";
System.out.println(s3.lastIndexOf("or"));//lastIndexOf(String str),返回从后往前找的第一个str的索引位置
System.out.println(s3.lastIndexOf("or", 6));//lastIndexOf(String str, int fromIndex),
//从fromIndex从右往前找,返回第一个str的索引位置

}

/*
* 有关替换的方法
* */
@Test
public void test3(){
String s1 = "hello world ll";
System.out.println(s1.replace('l', 'g'));//将所有oldChar替换成newChar
System.out.println(s1);//s1没有被改变
System.out.println(s1.replace("ll", "hh"));//也可以替换字符串(全部替换)
//replaceAll(),正则表达式的地方再讲
//replaceFirst(),正则表达式的地方再讲
//matches(),判断str是否和正则表达式符合
//split(),以正则表达式切割,返回String[]
}

/*
* String与基本数据类型、包装类之间的转换
* */
@Test
public void test4(){
//String --> 基本数据类型
String s1 = "123";
int n1 = Integer.parseInt(s1);
//基本数据类型 --> String
int num = 12356;
String s2 = String.valueOf(num);//调用valueOf()方法
String s3 = num + "";//使用 + 运算符连接
}

/*
* String与char[]之间的转换
* */
public void test5(){
//String --> char[]
String str = "abc123";
char[] ch = str.toCharArray();//调用String的toCharArray()方法
for (int i = 0; i < ch.length; i++) {
System.out.println(ch[i]);
}
//char[] --> String:调用String的构造器
char[] ch2 = new char[]{'a', 'g'};
String str2 = new String(ch2);//构造器
}

/*
* String与byte[]之间的转换
*
* 编码:字符串 --> 字节
* 解码:字节 --> 字符串
* UTF-8字符集中,一个汉字对应三个字节
* GBK字符集中,一个汉字对应两个字节
* 说明:解码时,要求解码使用的字符集必须与编码时使用的字符集一致,否则会出现乱码
* */
@Test
public void test6(){
//编码:String --> byte[]
String str1 = "abc123中国";
byte[] bytes = str1.getBytes();//使用默认字符集进行编码(默认utf-8)
System.out.println(Arrays.toString(bytes));
byte[] bytes1 = null;
try {
bytes1 = str1.getBytes("gbk");//使用指定字符集进行转换
System.out.println(Arrays.toString(bytes1));
} catch (UnsupportedEncodingException e) {
e.printStackTrace();
}
//解码:byte[] --> String:调用String构造器
String s = new String(bytes);//使用默认字符集进行解码(默认utf-8)
System.out.println(s);
String s1 = new String(bytes1);
System.out.println(s1);//使用gbk编码,却使用utf-8解码,会乱码
try {
String gbk = new String(bytes1, "gbk");//使用对应解码方法解码
System.out.println(gbk);
} catch (UnsupportedEncodingException e) {
e.printStackTrace();
}

}
}
# 关于 String 的算法练习
1
2
3
4
5
6
7
8
9
10
11
12
13
14
15
16
17
18
19
20
21
22
23
24
25
26
27
28
29
30
31
32
33
34
35
36
37
38
39
40
41
42
43
44
45
46
47
48
49
50
51
52
53
/**
* @author DzcGood
* @date 2021/9/10 - 16:03
*/


public class StringExer {
/*
* 习题一:获取一个字符串在另一个字符串中出现的次数
* */
public int getCount(String mainStr, String subStr){
int mainLen = mainStr.length();
int subLen = subStr.length();
if(mainLen < subLen){
return 0;
}
int count = 0;
int index = 0;
/*
* 使用indexOf方法,若上一次目标字符串出现的位置为index,则
* 下一次从index + subLen开始找,直到indexOf返回-1为止
* */
while((index = mainStr.indexOf(subStr, index)) != -1){
count++;
index +=subLen;
}
return count;
}

/*
* 习题二:获取两个字符串中的最大相同字串
* 目前假设只有一个最大相同子串,之后讲到集合的时候,可以改进
* 思路:将短的字符串进行长度依次递减的字串与较长的字串比较
* */
public String getMaxSameString(String str1, String str2){
if(str1 == null || str2 == null){
return null;
}
String maxStr = (str1.length() >= str2.length()) ? str1 : str2;
String minStr = (str1.length() < str2.length()) ? str1 : str2;
int len = minStr.length();
//滑动窗口法
for (int i = 0; i < len ; i++) {
for(int start = 0, end = len - i; end <= len; start++, end++){//关键点
String subStr = minStr.substring(start, end);
if(maxStr.contains(subStr)){
return subStr;
}
}
}
return null;
}
}

# StringBuffer、StringBuilder

1
2
3
4
5
6
7
8
9
10
11
12
13
14
15
16
17
18
19
20
21
22
23
24
25
26
27
28
29
30
31
32
33
34
35
36
37
38
39
40
41
42
43
44
45
46
47
48
49
50
51
52
53
54
55
56
57
58
59
60
61
62
63
64
65
66
67
68
69
70
71
72
73
74
75
76
77
78
79
80
81
82
83
84
85
86
87
import org.junit.Test;

/**
* @author DzcGood
* @date 2021/9/9 - 11:05
*/

/*
* 关于StringBuffer和StringBuilder类的使用
* 对比StringBuffer,StringBuilder,String的效率
* 答:StringBuilder > StringBuffer > String
* */
public class StringBuffer_StringBuilderTest {

/*
* String,StringBuffer,StringBuilder之间的区别?
* String:不可变;底层使用final char[]存储
* StringBuffer:可变,效率有点低,线程安全;底层使用char[]存储
* StringBuilder:可变,jdk5.0新增效率比StringBuffer高,线程不安全;底层使用char[]存储
*
* 源码分析:
* String str1 = new String();//底层:new char[0];
* String str2 = new String("abc");//底层:new char[]{'a', 'b', 'c'};
* StringBuffer str3 = new StringBuffer();//char[] value = new char[16];底层创建了一个长度是16的数组
* str3.append('a');//value[0] = 'a';
* str3.append('b');//value[1] = 'b';
* StringBuffer sb2 = new StringBuffer("abc");//char[] value1 = new char[3 + 16];
* 底层创建了长度是”abc“.length()+16的数组
* 问题1:sb2.length()的输出是3
* 问题2:扩容问题:如果要添加的数据底层数组盛不下了,就需要扩容低层的数组
* 默认情况下扩容位原来容量的2倍 + 2,同时将原有数组中的元素复制到新的数组中
* 指导意义:开发中建议使用StringBuffer(int capacity)或StringBuilder(int capacity)指定数组容量,
* 避免多次扩容,导致效率降低
* */
@Test
public void test1(){
StringBuffer sb1 = new StringBuffer("abc");
sb1.setCharAt(0,'m');//sb1本身被改变
System.out.println(sb1);
}


/*
* StringBuffer,StringBuilder中新增的方法,以StringBuffer为例
* */
@Test
public void test2(){
StringBuffer s1 = new StringBuffer("abc");
s1.append(1);//append()
s1.append('1');
s1.append("1");//结果都是在末尾加上字符1
System.out.println(s1);
s1.delete(2,4);//delete(int start, int end),删除[start, end)之间的字符串
s1.replace(2,4,"hello");//replace(start, end, str),将[start, end)之间的字符串换成str
s1.insert(0,"world");//insert(int index,str),在指定位置插入
System.out.println(s1);
s1.reverse();//reverse(),字符串逆序
//substring(),取字串
//length()
//charAt()
//setCharAt(int index, char ch)修改指定位置字符
/*
* 总结:关注以下几个方法
* 增:append
* 删:delete
* 改:replace, setCharAt
* 查:substring, charAt
* 长度:length
* 遍历:toString, for + charAt
* */
}

/*
* 面试题
* */
@Test
public void test3(){
String str = null;
StringBuffer sb = new StringBuffer();
sb.append(str);//不报错
System.out.println(sb.length());//4
System.out.println(sb);//"null",实际上是把str当成字符串”null“加入了sb
StringBuffer sb1 = new StringBuffer(str);//报错,空指针异常
//因为构造器会调用str.length()方法,这里导致空指针
System.out.println(sb1);//执行不到此处,上方异常未处理
}
}

# JDK8 之前的时间 API

# System 静态方法

1
2
3
4
5
6
7
8
//1、System类中的currentTimeMillis()
@Test
public void test1(){
long time = System.currentTimeMillis();
//返回当前时间与1970年1月1日0时0分0秒之间以毫秒为单位的时间差
//成为时间戳
System.out.println(time);
}

# Date 类

1
2
3
4
5
6
7
8
9
10
11
12
13
14
15
16
17
18
19
20
21
22
23
24
25
26
27
28
29
30
31
32
33
34
35
36
37
38
39
40
41
42
43
44
45
46
47
48
49
50
51
52
53
import org.junit.Test;

import java.util.Date;

/**
* @author DzcGood
* @date 2021/9/9 - 17:16
*/

/*
* JDK 8之前日期和时间的API测试
* */
public class DateTimeTest {
//1、System类中的currentTimeMillis()
@Test
public void test1(){
long time = System.currentTimeMillis();
//返回当前时间与1970年1月1日0时0分0秒之间以毫秒为单位的时间差
//成为时间戳
System.out.println(time);
}

/*+
* java.util.Date类
* | --- java.sql.Date类
* 1、两个构造器的使用
* 2、两个方法的使用
* > toString():显示当前的年月日时分秒
* > getTime():获取当前Date对象对应的时间戳
* 3、java.sql.Date对应数据库中的日期变量,和数据库交互时才会用到
* > 如何实例化
* > java.sql.Date date = new java.sql.Date(long date);
* > 如何将java.util.Date转换成java.sql.Date对象?
* >方法一:强转(会报错)
* >方法二:java.sql.Date date = new java.sql.Date(new java.util.Date().getTime());通过时间戳
* */
@Test
public void test2(){
//构造器一,Date(),创建一个对应当前时间的Date对象
Date date1 = new Date();
System.out.println(date1);//Thu Sep 09 17:23:49 CST 2021
System.out.println(date1.getTime());//获取当前Date对象对应的时间戳
//构造器二,Date(long date),创建指定毫秒数的Date对象
Date date = new Date(1631179672631L);
System.out.println(date1);
System.out.println(date1.getTime());
//创建java.sql.Date类对象
java.sql.Date date2 = new java.sql.Date(1631179672631L);
System.out.println(date2);//2021-09-09
System.out.println(date2.getTime());//1631179672631

}
}

# Calendar 类

1
2
3
4
5
6
7
8
9
10
11
12
13
14
15
16
17
18
19
20
21
22
23
24
25
26
27
28
29
30
/*
* java.util.Calendar类(日历类,抽象类)的使用
* 注意:获取月份时,1月是0,二月是1,以此类推,12月是11
* 获取星期时,周日是1,周一是2,以此类推,周六是7
* */
@Test
public void test3(){
//实例化
//方式一:创建其子类的对象
//方式二:调用其静态方法getInstance()方法
Calendar calendar = Calendar.getInstance();//返回的是java.util.GregorianCalendar类对象
//对应当前时间

//常用方法:
//get()
int days = calendar.get(Calendar.DAY_OF_MONTH);//今天是这个月的第几天
System.out.println(days);//13
System.out.println(calendar.get(Calendar.DAY_OF_YEAR));//今天是今年的第几天,256
//set()
calendar.set(Calendar.DAY_OF_MONTH, 22);//calendar类对象本身的信息被修改(类信息改成当前是这个月的第22天)
//add()
calendar.add(Calendar.DAY_OF_MONTH,3);//在现有这个月的第几天上,加了三天,变成第25天
//getTime(),用于日历类 --> Date类
Date date = calendar.getTime();
System.out.println(date);
//setTime(),用于Date --> 日历类
calendar.setTime(new Date());
System.out.println(calendar.get(Calendar.DAY_OF_MONTH));

}

# SimpleDateFormat 类

1
2
3
4
5
6
7
8
9
10
11
12
13
14
15
16
17
18
19
20
21
22
23
24
25
26
27
28
29
30
31
32
33
34
35
36
37
38
39
40
41
42
43
44
45
46
47
48
49
50
51
52
53
54
55
56
57
58
59
60
61
62
63
64
65
66
67
68
69
70
71
72
73
74
75
76
77
78
79
80
81
82
83
84
85
86
87
88
89
90
91
92
93
94
95
import org.junit.Test;

import java.text.ParseException;
import java.text.SimpleDateFormat;
import java.util.Date;

/**
* @author DzcGood
* @date 2021/9/10 - 17:36
*/

/*
* JDK8之前的时间API测试
* 1、System类中currentTimeMillis();
* 2、java.util.Date和其子类java.sql.Date
* 3、SimpleDateFormat
* 4、Calendar
* */
public class DateTimeTest {
/*
* SimpleDateFormat的使用:SimpleDateFormat对日期Date类的格式化和解析
* 1、两个操作
* 1.1 格式化:日期 --> 字符串
* 1.2 解析:字符串 --> 日期
* 2、SimpleDateFormat的实例化
* */
@Test
public void test1(){
//实例化SimpleDateFormat:使用默认构造器
SimpleDateFormat sdf = new SimpleDateFormat();
//格式化:日期 --> 字符串
Date date = new Date();
System.out.println(date);//Fri Sep 10 17:42:39 CST 2021
String format = sdf.format(date);//格式化返回的是字符串
System.out.println(format);//21-9-10 下午5:42
//解析:字符串 --> 日期
String str = "21-9-12 上午1:00";
Date date1 = null;
try {
date1 = sdf.parse(str);//parse方法会抛出异常,需要try-catch
System.out.println(date1);
} catch (ParseException e) {
e.printStackTrace();
}
/*
实例化SimpleDateFormat:使用带参数的构造器(可以去API里面找)
指定的构造器可以使用指定的格式进行格式化和解析
*/
SimpleDateFormat sdf1 = new SimpleDateFormat("yyyyy.MMMMM.dd GGG hh:mm aaa");
String format1 = sdf1.format(date);
System.out.println(format1);//02021.九月.12 公元 01:07 上午
/*
* 几个常用的格式:
* y:年
* M:月
* d:日
* h:时
* m:分
* s:秒
* */
SimpleDateFormat sdf2 = new SimpleDateFormat("yyyy-MM-dd hh:mm:ss");//开发中喜欢用这种
System.out.println(sdf2.format(new Date()));//2021-09-12 01:11:25
//解析,必须使用创建该对象时指定的格式
try {
//sdf2只能识别"yyyy-MM-dd hh:mm:ss"格式的时间
Date date2 = sdf2.parse("2020-01-02 23:32:11");
System.out.println(date2);
} catch (ParseException e) {
e.printStackTrace();
}
}

/*
* 练习一:字符串”2020-09-08“转换成java.sql.Date类
* 练习二:从1990-01-01开始,”三天打鱼,两天晒网“。问之后的某年某月某日,渔夫是在打鱼,还是在晒网
* 思路:先求得题目日期距离1990-01-01年有多少天,然后取模5运算
* 总天数求法:利用天数求得时间戳,二者相减。
* 总天数 = (date1.getTime() - date2.getTime()) / (1000 * 60 *60 *24) + 1
* 总天数 % 5 == 0,4 在晒网
* 总天数 % 5 == 1,2,3 在打鱼
* */
@Test
public void test2(){
SimpleDateFormat sdf = new SimpleDateFormat("yyyy-MM-dd");
Date date = null;
try {
date = sdf.parse("2020-09-08");
System.out.println(date);
} catch (ParseException e) {
e.printStackTrace();
}
java.sql.Date birthDate = new java.sql.Date(date.getTime());//java.sql.Date类的带参构造器
System.out.println(birthDate);
}
}

# JDK8 中新日期时间 API

# JDK8 时间 API 出现的原因
1
2
3
4
5
6
7
8
9
10
11
12
13
14
15
public class JDK8DateTest {
/*
* java.util.Date类的缺点(JDK8时间API出现的原因):
* 1、偏移性:时间是从1900年开始的,月份是从0开始的
* 2、格式化(SimpleDateFormat)只对Date有用,Calendar则不行
* 3、不是线程安全的
* 4、不能处理闰秒
* */
@Test
public void test1(){
//按照偏移性,表示2021年9月13日应该这样表示
Date date = new Date(2021 - 1900, 9 - 1, 13);//此方法已过时
System.out.println(date);//Mon Sep 13 00:00:00 CST 2021
}
}

# LocalDate、LocalTime、LocalDateTime

1
2
3
4
5
6
7
8
9
10
11
12
13
14
15
16
17
18
19
20
21
22
23
24
25
26
27
28
29
30
31
32
33
34
35
36
37
38
39
40
41
42
43
44
45
46
47
48
/*
* LocalDate、LocalTime、LocalDateTime类的使用
* 说明:
* 1、LocalDateTime类使用比其他两个类较多
* 2、类似于Calendar
* */
@Test
public void test2(){
/*
* 实例化
* */
//now():获取当前的日期、时间、日期时间
LocalDate localDate = LocalDate.now();//静态方法
LocalTime localTime = LocalTime.now();
LocalDateTime localDateTime = LocalDateTime.now();
System.out.println(localDate);//2021-09-20
System.out.println(localTime);//22:17:04.923
System.out.println(localDateTime);//2021-09-20T22:17:04.923
//of():不用考虑偏移量
LocalDateTime localDateTime1 = LocalDateTime.of(2021, 9, 20, 22, 20);
//2021年9月20日22时20分
System.out.println(localDateTime1);
/*
* getXxx():以LocalDateTime类为例(三各类都有共同方法),获取相关的属性
* */
System.out.println(localDateTime.getDayOfMonth());//20
System.out.println(localDateTime.getDayOfWeek());//MONDAY
System.out.println(localDateTime.getDayOfYear());//263
System.out.println(localDateTime.getMonth());//SEPTEMBER
System.out.println(localDateTime.getMonthValue());//9
System.out.println(localDateTime.getMinute());//23
/*
* withXxx():类似于set方法,设置相关的属性
* */
LocalDateTime localDateTime2 = localDateTime.withDayOfMonth(22);//此方法设置日期
System.out.println(localDateTime);//不可变性,localDateTime未改变
System.out.println(localDateTime2);

/*
* 加减操作
* 加:plusXxx()
* 减:minusXxx()
* */
LocalDateTime localDateTime3 = localDateTime.plusDays(1);//不可变性
System.out.println(localDateTime);
System.out.println(localDateTime3);
// localDateTime.minusXxx()
}

# Instant

1
2
3
4
5
6
7
8
9
10
11
12
13
14
15
16
17
18
19
20
21
22
23
24
25
26
27
28
29
30
31
import org.junit.Test;

import java.time.Instant;
import java.time.OffsetDateTime;
import java.time.ZoneOffset;

/**
* @author DzcGood
* @date 2021/9/20 - 22:41
*/
public class InstantTest {
/*
* Instant类的使用
* */
@Test
public void test(){
//now():获取本初子午线对应的标准时间
Instant instant = Instant.now();//静态方法
System.out.println(instant);//2021-09-20T14:46:15.739Z,对应的是UTC时间,比北京时间晚八个小时
//添加时间的偏移量
OffsetDateTime offsetDateTime = instant.atOffset(ZoneOffset.ofHours(8));
System.out.println(offsetDateTime);//2021-09-20T22:46:15.739+08:00
//toEpochMilli():获取瞬时点对应自1970年1月1日0时0分的毫秒数,类似于Date类的getTime()
long l = instant.toEpochMilli();
System.out.println(l);//1632149304356
//ofEpochMilli():通过给定的毫秒数,获取Instant实例。 类似于Date(long milli)
Instant instant1 = Instant.ofEpochMilli(1632149304356L);
System.out.println(instant1);
}

}

# DateTimeFormatter

1
2
3
4
5
6
7
8
9
10
11
12
13
14
15
16
17
18
19
20
21
22
23
24
25
26
27
28
29
30
31
32
33
34
35
36
37
38
39
40
41
42
43
44
45
46
47
48
49
50
51
import org.junit.Test;

import java.time.LocalDate;
import java.time.LocalDateTime;
import java.time.format.DateTimeFormatter;
import java.time.format.FormatStyle;
import java.time.temporal.TemporalAccessor;

/**
* @author DzcGood
* @date 2021/9/23 - 16:10
*/

/*
* DateTimeFormatter类的使用
* 1、类似于SimpleDateFormatter
* */
public class DateTimeFormatterTest {
@Test
public void test1(){
//实例化方式
//方式1:预定义的格式(ISO_LOCAL_DATE_TIME, ISO_LOCAL_DATE, ISO_LOCAL_TIME)
DateTimeFormatter formatter = DateTimeFormatter.ISO_LOCAL_DATE_TIME;
//格式化:日期 --> 字符串
LocalDateTime localDateTime = LocalDateTime.now();
String format = formatter.format(localDateTime);
System.out.println(localDateTime);//2021-09-23T16:14:51.195
System.out.println(format);//2021-09-23T16:14:51.195
//解析:字符串 --> 日期
TemporalAccessor parse = formatter.parse("2021-09-23T16:14:51.195");
System.out.println(parse);//{},ISO resolved to 2021-09-23T16:14:51.195
//实例化方式二:本地化相关的格式,如ofLocalizedDateTime(FormatStyle.LONG)
//FormatStyle.LONG, FormatStyle.MEDIUM, FormatStyle.SHORT: 适用于LocalDateTime
//形参不同,格式化后的格式不同
DateTimeFormatter dateTimeFormatter = DateTimeFormatter.ofLocalizedDateTime(FormatStyle.SHORT);
String format1 = dateTimeFormatter.format(localDateTime);
System.out.println(format1);//21-9-23 下午4:24
//本地化相关的格式,ofLocalizedDate()
//FormatStyle.FULL, FormatStyle.LONG, FormatStyle.MEDIUM, FormatStyle.SHORT: 适用于LocalDate
DateTimeFormatter dateTimeFormatter1 = DateTimeFormatter.ofLocalizedDate(FormatStyle.FULL);
String format2 = dateTimeFormatter1.format(LocalDate.now());
System.out.println(format2);//2021年9月23日 星期四
//重点: 实例化方式三,自定义的格式,如ofPattern("yyyy-MM-dd hh:mm:ss E ")
DateTimeFormatter dateTimeFormatter2 = DateTimeFormatter.ofPattern("yyyy-MM-dd hh:mm:ss");
String format3 = dateTimeFormatter2.format(LocalDateTime.now());
System.out.println(format3);//2021-09-23 04:45:20 (十二小时制)
TemporalAccessor parse1 = dateTimeFormatter2.parse("2021-09-23 04:45:20");
//{SecondOfMinute=20, MinuteOfHour=45, MicroOfSecond=0, NanoOfSecond=0, HourOfAmPm=4, MilliOfSecond=0},ISO resolved to 2021-09-23
System.out.println(parse1);
}
}

# Java 比较器

# Comparable 接口:自然排序

1
2
3
4
5
6
7
8
9
10
11
12
13
14
15
16
17
18
19
20
21
22
23
24
25
26
27
28
29
30
31
32
33
34
35
36
37
38
39
40
41
42
43
44
45
46
47
48
49
50
51
52
53
54
55
56
57
58
59
60
61
62
63
64
65
66
67
68
69
70
71
72
73
74
75
76
77
78
79
80
81
82
83
84
85
86
87
88
89
90
91
92
93
94
95
96
97
98
99
100
101
import org.junit.Test;

import java.util.Arrays;

/**
* @author DzcGood
* @date 2021/9/23 - 17:04
*/
/*
* Java比较器
* 一、说明:Java中的对象,正常情况下,只能进行比较 == 或 != 。 不能使用 > 或 < 的,但是在开发场景中,我们需要对多个对象进行
* 排序,言外之意,就需要比较对象的大小。
* 如何实现?使用两个接口中的任何一个:Comparable, Comparator
* 二、Comparable接口的使用
*
* */
public class CompareTest {
/*
* Comparable使用的举例:自然排序
* 1、String, 包装类等实现了Comparable接口,重写了compareTo()方法,给出了比较两个对象大小的方法
* 2、重写compareTo()接口的规则:
* 如果当前对象this大于形参对象obj,则返回正整数;
* 如果当前对象this小于形参对象obj,则返回负整数;
* 如果当前对象this等于形参对象obj,则返回0。
* 3、 对于自定义类来说,如果需要排序,我们可以让自定义类实现Comparable接口,重写compareTo()方法
* 在compareTo()方法中指明如何排序
* */
@Test
public void test1(){
String[] arr = new String[]{"AA", "DD", "BB"};
Arrays.sort(arr);//默认从小到大排序
System.out.println(Arrays.toString(arr));//[AA, BB, DD]
}

@Test
public void test2(){
Goods[] arr = new Goods[4];
arr[0] = new Goods("lenoveMouse", 34);
arr[1] = new Goods("dellMouse", 43);
arr[2] = new Goods("xiaomiMouse", 312);
arr[3] = new Goods("huaweiMouse", 65);
Arrays.sort(arr);
System.out.println(Arrays.toString(arr));
}
}

class Goods implements Comparable{
private String name;
private double price;

public Goods(String name, double price) {
this.name = name;
this.price = price;
}

public Goods() {
}

public String getName() {
return name;
}

public void setName(String name) {
this.name = name;
}

public double getPrice() {
return price;
}

public void setPrice(double price) {
this.price = price;
}

@Override
public String toString() {
return "Goods{" +
"name='" + name + '\'' +
", price=" + price +
'}';
}

//指明商品比较大小的方式:先按照价格从低到高排序,价格一样的按照商品名称进行排序
@Override
public int compareTo(Object o){
if(o instanceof Goods){
Goods goods = (Goods)o;
if(this.price > goods.price){
return 1;
}else if(this.price < goods.price){
return -1;
}else{
// return 0;
return this.name.compareTo(goods.name);//价格一样的按照名称排序
}
}
//方式二
// return Double.compare(this.price, goods.price);
throw new RuntimeException("传入的数据类型不一致!");
}
}

# Comparator 接口:定制排序

1
2
3
4
5
6
7
8
9
10
11
12
13
14
15
16
17
18
19
20
21
22
23
24
25
26
27
28
29
30
31
32
33
34
35
36
37
38
39
40
41
42
43
44
45
46
47
48
49
50
51
52
53
54
55
56
57
58
59
60
61
62
63
64
65
66
67
68
69
70
71
72
73
74
75
76
77
78
79
80
81
82
83
84
85
86
87
88
89
90
91
92
93
94
95
96
97
98
99
100
101
102
103
104
105
106
107
108
109
110
111
112
113
114
115
116
117
118
119
120
121
122
123
124
125
import org.junit.Test;

import java.util.Arrays;
import java.util.Comparator;

/**
* @author DzcGood
* @date 2021/9/23 - 17:46
*/
/*
* java.util.Comparator接口的使用
* 一、
* 1、背景:
* 当元素的类型没有实现java.lang.Comparable接口而又不方便修改代码
* 或者实现了java.lang.Comparable接口的排序规则不适合当前的操作,
* 那么就可以考虑使用Comparator的对象来排序
* 2、重写compare(Object o1, Object o2)方法,比较o1和o2的大小
* 如果方法返回正整数,则表示o1大于o2
* 如果方法返回负整数,则表示o1小于o2
* 如果方法返回0,则表示o1等于o2
* 二、Comparable与Comparator的对比
* 1、Comparable接口的方式一旦指定,保证Comparable接口实现类的对象在任何位置都可以比较大小
* 2、Comparator接口属于临时性的比较
* */
public class CompareToTest {
@Test//Comparator用于String类
public void test1(){
String[] arr = new String[]{"AA", "DD", "BB"};
Arrays.sort(arr, new Comparator(){
public int compare(Object o1, Object o2){
if(o1 instanceof String && o2 instanceof String){
String s1 = (String)o1;
String s2 = (String)o2;
return -s1.compareTo(s2);//按照从大到小排
}
throw new RuntimeException("输入的数据类型不一致");
}
});
System.out.println(Arrays.toString(arr));//[DD, BB, AA]
}

@Test//Comparator用于自定义类
public void test2(){
Goods[] arr = new Goods[4];
arr[0] = new Goods("lenoveMouse", 34);
arr[1] = new Goods("dellMouse", 43);
arr[2] = new Goods("xiaomiMouse", 312);
arr[3] = new Goods("huaweiMouse", 65);
Arrays.sort(arr, new Comparator<Goods>() {
//按照名称从大大小排序。名称相同的按价格从大到小排序
@Override
public int compare(Goods o1, Goods o2) {
if(o1.getName().equals(o2.getName())){
return -Double.compare(o1.getPrice(), o2.getPrice());
}else{
return -o1.getName().compareTo(o2.getName());
}
}
});
System.out.println(Arrays.toString(arr));
}
}

# System 类

1
2
3
4
5
6
7
8
9
10
11
12
13
14
15
16
17
18
19
//System类
@Test
public void test1(){
//getProperty(),参数有java.version, java.home, os.name, os.version, user.name, user.dir
String property = System.getProperty("java.version");//java版本
System.out.println(property);//1.8.0_291
String property1 = System.getProperty("java.home");//javahome的路径
System.out.println(property1);//C:\Program Files\Java\jdk1.8.0_291\jre
String property2 = System.getProperty("os.name");//系统名
System.out.println(property2);//Windows 10
String property3 = System.getProperty("os.version");//系统版本
System.out.println(property3);//10.0
String property4 = System.getProperty("user.name");//系统用户名
System.out.println(property4);//邓智超
String property5 = System.getProperty("user.home");//用户路径
System.out.println(property5);//C:\Users\DzcGood
String property6 = System.getProperty("user.dir");//当前工作路径
System.out.println(property6);//G:\JAVA\learn\day19
}

# Math 类

1
2
3
4
5
6
7
8
9
10
11
12
13
14
15
16
17
18
19
/Math类
@Test
public void test2(){
/*
* 常用方法:
* abs 绝对值
* acos, asin, atan, sin, cos, tan 三角函数
* sqrt 平方根
* pow(double a, double b) a的b次幂
* log 自然对数
* exp e为低指数
* max(double a, double b)
* min(double a, double b)
* random() 返回[0.0, 1.0)的随机数
* long round(double a) double型数据a转换为long型(四舍五入)
* toDegrees(double angrad) 弧度 -> 角度
* toRadians(double angdeg) 角度 -> 弧度
* */
}

# BigInteger 和 BigDecimal

BigInteger 和 BigDecimal 可以用来表示 long 和 double 表示不了的大数,可以任意大小,任意精度。商业计算中,要求数字精度比较高,故用到 java.math.BigDecimal。

1
2
3
4
5
6
7
8
9
10
//BigInteger和BigDecimal
@Test
public void test3(){
BigInteger bi = new BigInteger("12435678765432456789876543234565434567890987654345654");
BigDecimal bd = new BigDecimal("1345.54232");
BigDecimal bd2 = new BigDecimal("11");
System.out.println(bi);
System.out.println(bd.divide(bd2, BigDecimal.ROUND_HALF_UP));//四舍五入的方式
System.out.println(bd.divide(bd2, 25, BigDecimal.ROUND_HALF_UP));//四舍五入的方式,保留25位小数
}

# 枚举类

1
2
3
4
5
6
7
8
9
10
11
12
13
14
15
16
/*
* 一、枚举类的使用
* 1、枚举类的理解:类的对象只有有限个,确定的,我们称此类位枚举类
* 2、当需要定义一组常量时,强烈建议使用枚举类
* 3、如果枚举类中只有一个对象,则可以作为单例模式的实现方式
* 二、如何定义枚举类
* 方式一:JDK5.0之前,自定义枚举类
* 方式二:JDK5.0之后,可以使用enum关键字定义枚举类
* 三、Enum类的常用方法
* 1、values()
* 2、valueOf()
* 3、toString()
* 四、使用enum关键字定义的枚举类实现接口的情况
* 1、情况一:实现接口,在enum类中实现抽象方法
* 2、情况二:让枚举类的对象,分别去实现接口中的抽象方法
* */

# JDK5.0 之前声明枚举类

1
2
3
4
5
6
7
8
9
10
11
12
13
14
15
16
17
18
19
20
21
22
23
24
25
26
27
28
29
30
31
32
/自定义枚举类
class Season{
//1、声明Season对象的属性:用private final修饰
private final String seasonName;
private final String seasonDesc;
//2、私有化类的构造器
private Season(String seasonName, String seasonDesc) {
this.seasonName = seasonName;
this.seasonDesc = seasonDesc;
}
//3、提供当前枚举类的多个对象,声明为public static final
public static final Season SPRING = new Season("春天", "春暖花开");
public static final Season SUMMER = new Season("夏天", "夏日炎炎");
public static final Season AUTUMN = new Season("秋天", "秋高气爽");
public static final Season WINTER = new Season("冬天", "冰天雪地");
//其他诉求:获取枚举类对象的属性
public String getSeasonName() {
return seasonName;
}

public String getSeasonDesc() {
return seasonDesc;
}

@Override
public String toString() {
return "Season{" +
"seasonName='" + seasonName + '\'' +
", seasonDesc='" + seasonDesc + '\'' +
'}';
}
}

# 用 enum 关键字声明枚举类

1
2
3
4
5
6
7
8
9
10
11
12
13
14
15
16
17
18
19
20
21
22
23
24
25
26
27
28
29
30
31
32
33
34
35
36
37
38
39
40
41
42
43
44
45
46
47
48
49
50
51
52
53
54
interface Info{
void show();
}

//使用enum定义枚举类
enum Season1 implements Info{
//1、提供当前枚举类的多个对象,对象之间用",隔开",最后一个对象以";"结束
SPRING("春天", "春暖花开"){//鸽子实现接口中的方法
@Override
public void show(){
System.out.println("春天在哪里");
}
},
SUMMER("夏天", "夏日炎炎"){
@Override
public void show(){
System.out.println("宁静的夏天");
}
},
AUTUMN("秋天", "秋高气爽"){
@Override
public void show(){
System.out.println("秋天是分手的季节");
}
},
WINTER("冬天", "冰天雪地"){
@Override
public void show(){
System.out.println("大雪纷飞");
}
};
//2、声明Season对象的属性:用private final修饰
private final String seasonName;
private final String seasonDesc;
//2、私有化类的构造器
private Season1(String seasonName, String seasonDesc) {
this.seasonName = seasonName;
this.seasonDesc = seasonDesc;
}

//其他诉求:获取枚举类对象的属性
public String getSeasonName() {
return seasonName;
}

public String getSeasonDesc() {
return seasonDesc;
}

// @Override
// public void show(){
// System.out.println("这是一个季节");
// }
}

# 注解

1
2
3
4
5
6
7
/*
* 注解的使用
* 1、理解注解
* Annotation是代码里的特殊标记,这些标记可以在编译、类加载、运行时被读取,并执行相应的处理。通过使用Annotation,
* 程序员可以在不改变原有逻辑的情况下,在源文件中嵌入一些补充信息。
* 2、在某种意义上,框架 = 注解 + 映射 + 设计模式
* */

# 注解的使用

1
2
3
4
5
6
7
8
9
10
11
12
13
14
15
16
17
18
19
20
21
22
23
24
25
26
27
28
29
30
31
32
33
34
35
36
37
38
39
40
41
42
43
44
45
46
/*
* Annotation的实例
* > 示例一:生成文档相关的注解
* > 示例二:在编译时进行格式检查(JDK内置的三个注解)
* @Override:限定重写父类方法,该注解只能用于方法
* @Deprecated:用于表示所修饰的元素(类、方法等)已过时。通常是因为所修饰的结构危险或存在更好的选择
* @SuppressWarnings:抑制编译器警告
* > 示例三:跟踪代码依赖性,实现替代配置文件功能
* */
public class AnnotationTest {
public static void main(String[] args) {
@SuppressWarnings("unused")
int num = 10;//抑制编译器对于”定义的变量未使用”的警告
@SuppressWarnings({"unused", "rawtypes"})//抑制编译器对于”定义的变量未使用”和"未使用泛型"的警告
ArrayList list = new ArrayList();
}
}

@MyAnnotation(value = "hi")//使用自定义的注解
class Person{
private String name;
private int age;

public Person() {
}

public Person(String name, int age) {
this.name = name;
this.age = age;
}

public void walk(){
System.out.println("人走路");
}

public void eat(){
System.out.println("人吃饭");
}
}

class Student extends Person{
@Override//重写父类方法的注释,会在编译的时候强制要求重写方法(可用作检查校验)
public void walk(){
System.out.println("学生走路");
}
}

# 自定义注解

1
2
3
4
5
6
7
8
9
10
11
12
13
14
15
16
17
18
19
20
21
22
/*
* 如何自定义注解:参照SuppressWarnings定义
* ① 注解定义格式为 @interface
* ② 内部定义成员,通常使用value表示
* ③ 可以指定成员的默认值,使用default定义
* ④ 如果自定义注解没有成员,表明是一个“标识”作用
* 如果注解用成员,在使用注解时,需要指明成员的值
* 自定义注解必须配上注解的信息处理流程(使用反射)才有意义
* */

/*
* 自定义注解
* */
public @interface MyAnnotation {
String value() default "hello";//这个是成员,不是方法。默认值是hello
}

@MyAnnotation(value = "hi")//使用自定义的注解
class Person{
private String name;
private int age;
}

# 元注解:修饰其他注解的注解

1
2
3
4
5
6
7
8
9
10
11
12
13
14
15
16
17
18
19
/*
* JDK提供的四种元注解
* 1、元注解:对现有的注解进行解释说明的注解
* 2、说明:
* ① Retention:指明所修饰的Annotation的生命周期
* 其包括一个RetentionPolicy类型的成员变量,使用@Retention时必须为该value成员变量指定值
* {RetentionPolicy.SOURCE, RetentionPolicy.CLASS, RetentionPolicy.RUNTIME},
* 分别代表:
* 源文件中有效:该注解会被编译器抛弃;
* class文件中有效:该注解在程序运行时会被抛弃(默认状态);
* 运行时有效:该注解在程序运行时有效
* ② Target:指明所修饰的注解能够修饰什么程序元素,包括TYPE, FIELD, METHOD, PARAMETER, CONSTRUCTOR,
* LOCAL_VARIABLE, ANNOTATION_TYPE, PACKAGE, TYPE_PARAMETER,TYPE_USE
* ③ Documented:表示所修饰的注解在被javadoc解析时,被提取成文档,
* 定义为Documented的注解必须设置Retention值为RUNTIME
* ④ Inherited:被修饰的注解将具有继承性
* 例如MyAnnotation被Inherited修饰,且被用于修饰Person类,那么Person类的子类也自动被MyAnnotation修饰
* 3、自定义注解通常都会指明两个元注解:Retention和Target
* */

# 通过反射获取注解

1
2
3
4
5
6
7
8
9
//通过反射获取注解
@Test
public void test(){
Class student = Student.class;
Annotation[] annotations = student.getAnnotations();
for (int i = 0; i < annotations.length; i++) {
System.out.println(annotations[i]);//@MyAnnotation(value=hi)
}
}

# JDK8 中注解的新特性

# 可重复注解

1
2
3
4
5
6
7
8
9
10
11
12
13
14
15
/*
* 实现可重复注解:
* 1、JDK8之前的写法:
* public @interface MyAnnotations {
* MyAnnotation[] value;
* }
* @MyAnnotations({@MyAnnotation(value = "hi"), @MyAnnotation(value = "hello")})
* 2、JDK8之后的写法:
* @Repeatable(MyAnnotations.class)
* public @interface MyAnnotation {
* String value() default "hello";//这个是成员,不是方法。默认值是hello
* }
* ①在MyAnnotation上声明@Repeatable,成员值为MyAnnotations.class
* ②MyAnnotation的Target和Retention必须和MyAnnotations相同
* */

# 类型注解

1
2
3
4
5
6
7
8
9
10
11
12
/*
* 类型注解
* 1、TYPE_PARAMETER:表示该注解能写在类型变量的声明语句中,如泛型声明
* 2、TYPE_USE:表示该注解能写在使用类型的任何语句中
* */
//TYPE_PARAMETER
class Generic<@MyAnnotation T>{//声明为TYPE_USE后,注解可以出现在任何类型前
public void show()throws @MyAnnotation RuntimeException{
ArrayList<@MyAnnotation String> list = new ArrayList<>();
int num = (@MyAnnotation int)10L;
}
}

# 集合

# 概述

1
2
3
4
5
6
7
8
9
10
11
12
13
14
15
16
17
18
/*
* 一、集合框架的概述
* 1、集合、数组都是对多个数据进行存储操作的结构,简称Java容器
* 说明:此时的存储,主要指的是内存层面的存储,不涉及到持久化的存储(.txt, .jpg, .avi, 数据库中是持久化层面的)
* 2.1、数组在存储多个数据方面的特点:
* > 一旦初始化以后,其长度就确定了。
* > 一旦定义好,其元素的类型也就确定了。我们只能操作指定类型的数据。比如 String[] arr; int[] arr1;
* 2.2 数组在存储多个数据的缺点:
* > 一旦初始化以后,其长度不可修改
* > 数组中提供的方法非常有限,对于添加、删除、插入数据等操作,非常不便,同时效率也不高
* > 获取数组中实际元素的个数的需求,数组没有线程的属性或方法可用
* > 数组存储数据的特点:有序、可重复。对于无序、不可重复
z* 3、集合可分为Collection和Map两种体系
* 3.1 Collection接口:单列数据,定义了存取一组对象的方法的集合
* > List:元素有序、可重复的集合
* > Set:元素无序、不可重复的集合
* 3.2 Map接口:双列数据,保存具有映射关系“key-value对”的集合
* */

# 集合框架

1
2
3
4
5
6
7
8
9
10
11
/*
* 二、集合框架
* |---- Collection接口:单列集合,用来存储一个一个的对象
* |---- List接口:存储有序的、可重复的数据。 --> 类似于"动态"数组
* |---- ArrayList、LinkedList、Vector
* |---- Set接口:存储无序的、不可重复的数据 --> 类似于高中讲的“集合”
* |---- HashSet、 LinkedHashSet、TreeSet
* |---- Map接口:双列集合,用来存储一对一对(key, value)的数据 --> 类似于高中函数 y = f(x),
* 一个key对应一个value,一个value可以对应多个key
* |---- HashMap、LinkedHashMap、TreeMap、HashTable、Properties
* */

# Collection 接口

1
2
3
4
5
6
7
8
9
10
11
12
13
14
15
16
17
18
19
20
21
22
23
24
25
26
27
28
29
30
31
32
33
34
35
36
37
38
39
40
41
42
43
44
45
46
47
48
49
50
51
52
53
54
55
56
57
58
59
60
61
62
63
64
65
66
67
68
69
70
71
72
73
74
75
76
77
78
79
80
81
//add(Object e):将元素e添加到集合中
//向Collection接口的实现类的对象中添加数据obj时,要求重写obj所在类的equals()方法
//size():获取添加的元素的个数
//addAll(Collection c):将集合c中的元素添加到当前的集合中
//isEmpty():判断当前集合是否为空(是否有元素)
//clear():清空集合中的所有元素
//contains(Object e):判断当前集合中是否包含对象e。对于对象,判断的是equals()方法而不是==运算符。
//所以实现相关功能需要考虑是否重写equals()方法
//containsAll(Collection coll1):判断形参coll1中的所有元素是否都存在于当前集合中
//remove(Object o):删, 返回值是boolean,表示是否删除成功
//仍然需要重写equals()方法,因为是逐个判断是否和目标相同的
//removeAll(Collection coll1):从当前集合中移除coll1中所有的元素
//仍然需要重写equals()方法,因为是逐个判断是否和目标相同的
//retrainAll(Collection coll1):求与coll1的交集(次操作会修改原有集合)。返回值是boolean
//equals(Object obj):判断两个集合是否相等。
//hashCode():返回当前对象的hash值
//Arrays.asList():数组转换成集合
//iterator():返回一个迭代器接口的实例,用于遍历集合元素
public class CollectionTest {
@Test
public void test1() {
Collection collection = new ArrayList();
//add(Object e):将元素e添加到集合中
//向Collection接口的实现类的对象中添加数据obj时,要求重写obj所在类的equals()方法
collection.add("AA");
collection.add("BB");
collection.add(123);//自动装箱
collection.add(new Date());
//size():获取添加的元素的个数
System.out.println(collection.size());//4
//addAll(Collection c):将集合c中的元素添加到当前的集合中
Collection collection1 = new ArrayList();
collection.add("CC");
collection.add(456);//自动装箱
collection.addAll(collection1);
System.out.println(collection);//[AA, BB, 123, Wed Sep 29 00:49:29 CST 2021, CC, 456]
//isEmpty():判断当前集合是否为空(是否有元素)
System.out.println(collection.isEmpty());//false
//clear():清空集合中的所有元素
collection.clear();
System.out.println(collection.isEmpty());//true
//contains(Object e):判断当前集合中是否包含对象e。对于对象,判断的是equals()方法而不是==运算符。
//所以实现相关功能需要考虑是否重写equals()方法
System.out.println(collection.contains("AA"));//false
collection.add("AA");
System.out.println(collection.contains("AA"));//true
//containsAll(Collection coll1):判断形参coll1中的所有元素是否都存在于当前集合中
collection.add(123);
collection.add(456);
Collection coll1 = Arrays.asList(123,456);//返回的是含有123和456的list
collection.containsAll(coll1);//true
//remove(Object o):删, 返回值是boolean,表示是否删除成功
//仍然需要重写equals()方法,因为是逐个判断是否和目标相同的
collection.remove(123);
System.out.println(collection);
//removeAll(Collection coll1):从当前集合中移除coll1中所有的元素
//仍然需要重写equals()方法,因为是逐个判断是否和目标相同的
collection.removeAll(Arrays.asList("AA", 456));
System.out.println(collection);//[] (空)
//retrainAll(Collection coll1):求与coll1的交集(次操作会修改原有集合)。返回值是boolean
collection.add(123);
collection.retainAll(Arrays.asList(123,456));
System.out.println(collection);//[123]
//equals(Object obj):判断两个集合是否相等。
System.out.println(collection.equals(Arrays.asList(123)));//true
//hashCode():返回当前对象的hash值
System.out.println(collection.hashCode());
//toArray(): 集合转换成数组(返回值是Object[]类型)
Object[] objects = collection.toArray();
for (int i = 0; i < objects.length; i++) {
System.out.println(objects[i]);
}
//Arrays.asList():数组转换成成集合
List<String> list = Arrays.asList("AA", "BB");
//注意:new int[]{123, 456}被当成是一个元素装入List;new Integer[]{123, 456}则是两个元素被装入list
List arr1 = Arrays.asList(new int[]{123, 456});
System.out.println(arr1.size());//1
List arr2 = Arrays.asList(new Integer[]{123, 456});
System.out.println(arr2.size());//2
//iterator():返回一个迭代器接口的实例,用于遍历集合元素,见“Iterator接口”
}

# Iterator 接口

1
2
3
4
5
6
7
8
9
10
11
12
13
14
15
16
17
18
19
20
21
22
23
24
25
26
27
28
29
30
31
32
33
34
35
36
37
38
39
40
41
42
43
44
45
46
/*
* 集合元素的遍历操作,使用Iterator接口
* 1、内部的方法:hasNext(), next()
* 2、内部定义了remove()方法,此处的方法不同于Collection中的remove方法。
* 如果还没调用next()或在上一次调用next方法之后已经调用了remove()方法,再调用remove都会报IllegalStateException
* */
public class IteratorTest {
@Test
public void test1(){
Collection collection = new ArrayList();
collection.add(123);
collection.add(456);
collection.add(new Person("Jerry", 20));
collection.add(new String(("Tom")));
collection.add(false);
Iterator iterator = collection.iterator();//迭代器
//迭代器越界后会报错:NoSuchElementException
//正确的迭代方法
while (iterator.hasNext()){
System.out.println(iterator.next());
}
}

@Test
public void test2(){
Collection collection = new ArrayList();
collection.add(123);
collection.add(456);
collection.add(new Person("Jerry", 20));
collection.add(new String(("Tom")));
collection.add(false);
Iterator iterator = collection.iterator();//迭代器
while(iterator.hasNext()){
Object obj = iterator.next();
if("Tom".equals(obj)){
//删除集合中的"Tom",如果还没调用next()或在上一次调用next方法之后已经调用了remove()方法,
//再调用remove都会报IllegalStateException
iterator.remove();
}
}
iterator = collection.iterator();//迭代器,因为前面iterator已经指向末尾,所以此处要重新生成
while (iterator.hasNext()){
System.out.println(iterator.next());
}
}
}

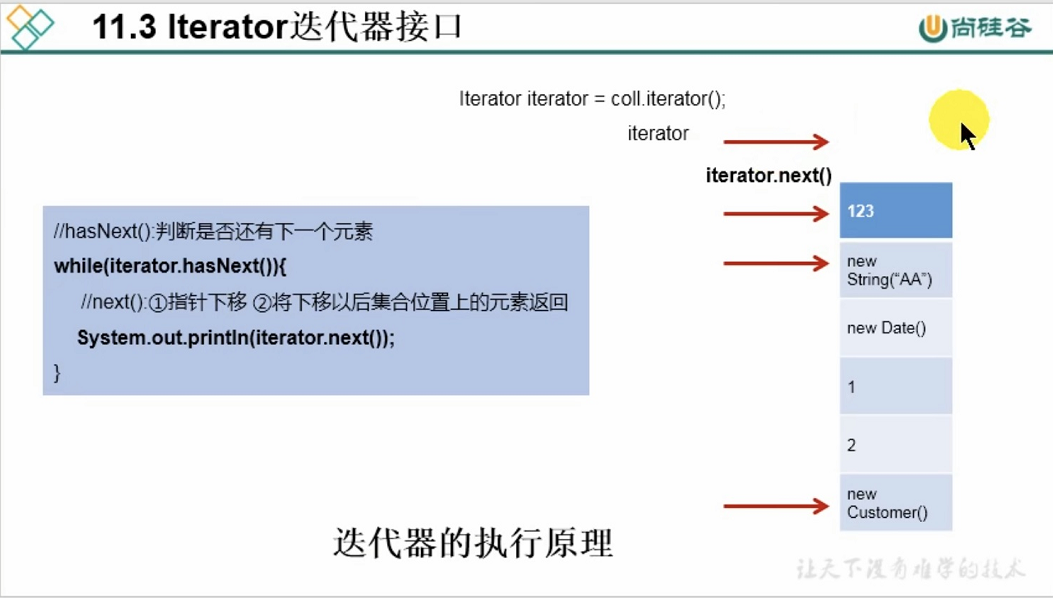
迭代器的执行原理:

迭代器的执行原理

# 使用 For - each 遍历集合和数组

1
2
3
4
5
6
7
8
9
10
11
12
13
14
15
16
17
18
/*
* 使用for - each遍历集合、数组(JDK5.0新增)
* */
public class ForEachTest {
@Test
public void test(){
Collection collection = new ArrayList();
collection.add(123);
collection.add(456);
collection.add(new Person("Jerry", 20));
collection.add(new String(("Tom")));
collection.add(false);
//for(集合/数组元素类型 : 局部变量, 集合/数组对象){}
for(Object obj : collection){
System.out.println(obj);
}
}
}

# List 接口

# ArrayList 源码分析

1
2
3
4
5
6
7
8
9
10
11
12
13
14
15
16
17
/*
* 3、ArrayList源码分析:
* JDK7情况下:
* ArrayList list = new ArrayList();//底层创建了初始长度为10的数组
* list.add(123);//element[0] = new Integer(123);
* ...
* list.add(11);//如果此次的添加导致底层数组容量不构,则扩容;
* //默认扩容为原先长度的1.5倍,并将原有数组数据复制到新数组中
* 建议:开发中使用带参的构造器:ArrayList(int initialCapacity),尽量避免扩容
* JDK8情况下:
* ArrayList list = new ArrayList();//底层Object[] element初始化为{},并没有创建长度为10的数组
* list.add(123);//第一次调用add()时,底层才创建了长度10的数组,并将123添加到element[]
* ...
* 后续的添加和扩容操作与JDK7无异
* 小结:JDK7中的ArrayList对象创建类似于单例模式中的饿汉式,而JDK8中的ArrayList对象的创建类似于懒汉式,
* 延迟了数组的创建,节约了内存
* */

# LinkedList 源码分析

1
2
3
4
5
6
7
8
9
10
11
12
13
14
15
16
17
/*
* 4、LinkedList源码分析:
* LinkedList list = new LinkedList();//内部声明了类型的first和last属性(头指针和尾指针),默认值为null
* list.add(123);//将123封装到Node中,创建了Node对象,并插入到双向链表的末尾
* 其中,链表结点Node的定义为:
* private static class Node<E> {
* E item;
* Node<E> next;
* Node<E> prev;
*
* Node(Node<E> prev, E element, Node<E> next) {
* this.item = element;
* this.next = next;
* this.prev = prev;
* }
* }
* */

# Vector 源码分析

1
2
3
4
/*
* 4、Vector源码分析:
* JDK7和JDK8中通过Vector()构造器创建对象时,底层都创建了长度为10的数组,在扩容方面,默认扩容为原来数组长度的2倍
**/

# List 接口中的常用方法

1
2
3
4
5
6
7
8
9
10
11
12
13
14
15
16
17
18
19
20
21
22
23
24
25
26
27
28
29
30
31
32
33
34
35
36
37
38
39
40
41
42
43
44
45
46
47
48
49
50
51
52
53
54
//void add(int index, Object obj):在index位置插入元素
//boolean addAll(int index, Collection c):在index位置开始将集合c的所有元素插入
//Object get(int index):获取索引值为index的元素
//int indexOf(Object o):返回o第一次出现的位置,若没有,则返回-1
//int lastIndexOf(Object o):返回o最后一次出现的位置,若没有,则返回-1
//Object remove(int index):按索引删除元素,并返回该元素
//Object set(int index, Object o):将index位置的元素设置成o,并返回该索引位置修改前的值
//说明:remove(Object o)和remove(int index),index和o一样的时候,默认是当成索引,如果想作为Object,可使用自动装箱
/*
* 总结:常用方法有
* 增:add(Object o)
* 删: remove(int index) / remove(Object o)
* 改: set(int index, Object o)
* 查: get(int index) / indexOf(Object o) / lastIndexOf(Object o)
* 插: add(int index, Object o)
* 长度: size()
* 遍历: ①iterator迭代器 ②for - each ③普通for循环,按照索引访问
* */
@Test
public void test1(){
ArrayList list = new ArrayList();
list.add(123);
list.add(456);
list.add("AA");
list.add(new Person("Tom", 12));
list.add(456);
System.out.println(list);//[123, 456, AA, Person@4dcbadb4, 456]
//void add(int index, Object obj):在index位置插入元素
list.add(1, "BB");
System.out.println(list);//[123, BB, 456, AA, Person@4dcbadb4, 456]
//boolean addAll(int index, Collection c):在index位置开始将集合c的所有元素插入
list.addAll(1, Arrays.asList(1,2,3));
// list.add(Arrays.asList(1,2,3));//注意区分
System.out.println(list.size());//6 + 3 = 9
//Object get(int index):获取索引值为index的元素
Object o = list.get(1);
System.out.println(o);
//int indexOf(Object o):返回o第一次出现的位置,若没有,则返回-1
//int lastIndexOf(Object o):返回o最后一次出现的位置,若没有,则返回-1
int i = list.indexOf(456);
System.out.println(i);
int i1 = list.lastIndexOf(456);
System.out.println(i1);
//Object remove(int index):按索引删除元素,并返回该元素
Object obj = list.remove(1);
System.out.println(obj);
//Object set(int index, Object o):将index位置的元素设置成o,并返回该索引位置修改前的值
System.out.println(list);
Object obj1 = list.set(0, 111);
System.out.println(obj1);
System.out.println(list);
//List subList(int fromIndex, int endIndex):返回子列表,[fromIndex, endIndex)
System.out.println(list.subList(0,2));
}

# Set 接口

# 添加元素的过程

1
2
3
4
5
6
7
8
/*
* 添加元素的过程:以HashSet为例
* 我们向HashSet中添加元素a,首先调用元素a所在类的hashCode()方法,计算元素a的哈希值,此哈希值接着通过某种算法计算出
* HashSet底层数组中的存放位置(即:索引位置),判断数组此位置上是否已经铀元素:如果此位置上没有其他元素,则元素a添加成功。
* 如果此位置上有其他元素b(或以链表形式存在的多个元素),则比较元素a与元素b的hash值,如果hash值不相同,则元素a添加成功,
* 如果hash值相同,进而调用元素a所在类的equals()方法。若返回true,则元素a添加失败。若返回false,则元素a添加成功。
* JDK7中,链表是头插入;JDK8中,链表是尾插入
* */

# HashSet

1
2
3
4
5
6
7
8
9
10
11
12
13
14
15
16
17
18
19
20
21
22
23
24
25
26
27
28
29
30
31
32
33
34
35
36
37
38
39
40
41
42
43
44
import org.junit.Test;

import java.util.HashSet;
import java.util.Set;

/**
* @author DzcGood
* @date 2021/10/2 - 0:09
*/

/*
* 1、Set接口的框架
* |---- Collection接口:单列集合,用来存储一个一个的对象
* |---- Set接口:存储无序的、不可重复的数据 --> 类似于高中讲的“集合”
* |---- HashSet:Set接口的主要实现类;线程不安全的;可以存储null值
* |---- LinkedHashSet:是HashSet的子类;遍历其内部数据时,可以按照添加的顺序遍历
* |---- TreeSet:使用红黑树存储的,要求元素必须是同一类型,可按照某种属性进行排序
* 2、Set接口中没有额外定义的方法,使用的都是Collection中的方法
* 3、要求:向Set中添加的数据,其所在类一定要重写hashCode()和equals()
* 重写的hashCode()和equals()尽可能保持一致性:相等的对象必须具有相等的散列码
* */
public class SetTest {
/*
* 一、Set:无序存储的、不可重复的数据
* 以HashSet为例说明:
* 1、无序性:不等于随机性。存储的数据在底层数组中并非按照数组索引的顺序添加。而是根据数据的Hash值决定的。
* 2、不可重复性:保证添加的元素按照equals()方法判断时,不能返回true。即,相同的元素只能添加一个。
* 二、添加元素的过程:以HashSet为例
* 我们向HashSet中添加元素a,首先调用元素a所在类的hashCode()方法,计算元素a的哈希值,此哈希值接着通过某种算法计算出
* HashSet底层数组中的存放位置(即:索引位置),判断数组此位置上是否已经铀元素:如果此位置上没有其他元素,则a添加成功
* 如果此位置上有其他元素b(或以链表形式存在的多个元素),则比较元素a与元素b的hash值,如果hash值不相同,则a添加成功
* 如果hash值相同,进而调用元素a所在类的equals()方法。若返回true,则元素a添加失败。若返回false,则元素a添加成功。
* JDK7中,链表是头插入;JDK8中,链表是尾插入
* HashSet底层存储原理:数组 + 链表 + 红黑树
* */
@Test
public void test1(){
Set set = new HashSet();
set.add(456);
set.add(123);
set.add("AA");
set.add("CC");
}
}

# LinkedHashSet

1
2
3
4
5
6
7
8
9
10
11
12
13
14
15
16
/*
* LinkedHashSet的使用
* 1、LinkedHashSet中的元素被封装成一个结点e,这些结点按照元素的添加顺序以双向链表的方式互相连接,这样,就可以按照元素添加
* 顺序来遍历LinkedHashSet。
* 2、优点:对于频繁的遍历操作,LinkedHashSet的效率高于HashSet
* */
@Test
public void test2(){
Set set = new LinkedHashSet();
set.add(456);
set.add(123);
set.add("AA");
set.add("CC");
set.add(new Person("Tom", 12));
}

# TreeSet

1
2
3
4
5
6
7
8
9
10
11
12
13
14
15
16
17
18
19
20
21
22
23
24
25
26
27
28
29
30
31
32
33
34
35
36
37
38
39
40
41
42
43
44
45
46
47
48
49
50
51
52
53
54
55
56
57
58
59
60
61
62
63
64
65
66
67
import org.junit.Test;

import java.util.*;

/**
* @author DzcGood
* @date 2021/10/2 - 14:26
*/

/*
* TreeSet类的使用
* 1、向TreeSet中添加的数据,要求是相同类的对象
* 2、两种排序方式:自然排序(实现CompareTo接口)和定制排序(Comparator)
* 3、自然排序中,比较两个元素是否相同的标准为compareTo()方法,不再是equals()方法
* 4、自定义排序中,比较两个元素是否相同的标准为compareTo()方法,不再是equals()方法
* */
public class TreeSetTest {
@Test
public void test1(){
Set set = new TreeSet();
set.add(456);
set.add(123);
// set.add("AA");//错误添加方式,“AA”与整型数据类型不一样
// set.add("CC");
// set.add(new Person("Tom", 12));
set.add(24);
for (Object o : set) {
System.out.println(o);
}
}

@Test
public void test2(){
Set set = new TreeSet();
set.add(new Person("Tom", 12));//Person类已重写compareTo()方法,按照年龄大小排序
set.add(new Person("Tom", 14));
set.add(new Person("Tom", 13));
Iterator iterator = set.iterator();
while(iterator.hasNext()){
System.out.println(iterator.next());
}
}

@Test
public void test3(){
Comparator comparator = new Comparator(){
@Override
public int compare(Object o1, Object o2){
if(o1 instanceof Person && o2 instanceof Person){
return Integer.compare(((Person) o1).getAge(), ((Person) o2).getAge());
}else{
throw new RuntimeException("类型不匹配");
}
}
};
Set set = new TreeSet(comparator);//使用自定义的排序方式
set.add(new Person("Tom", 12));//虽然Person类已重写compareTo()方法,但TreeSet的构造器使用了定制排序
set.add(new Person("Tom", 14));
set.add(new Person("Tom", 13));
Iterator iterator = set.iterator();
while(iterator.hasNext()){
System.out.println(iterator.next());
}
}
}

# 面试题

1
2
3
4
5
6
7
8
9
10
11
12
13
14
15
16
17
18
19
20
21
22
/*
* 一道面试题
* */
@Test
public void test3(){
HashSet set = new HashSet();
Person person1 = new Person("AA", 1001);
Person person2 = new Person("BB", 1001);
set.add(person1);
set.add(person2);
person1.setName("CC");
//这里会删除失败,因为person1中的属性被修改,导致hashCode值改变。用新的hashCode值去索引,会找不到目标
set.remove(person1);
//输出还是有两个person
System.out.println(set);
//会添加成功,虽然元素重复,但新的hashCode对应的位置是空的,可以添加
set.add(new Person("CC",1001));
System.out.println(set);//输出三个person
//还是能添加成功,虽然hashCode相同,但equals()返回不相同
set.add(new Person("AA",1001));
System.out.println(set);//会输出四个person
}

# Map 接口

# Map 接口框架

1
2
3
4
5
6
7
8
9
10
11
/*
* 一、Map接口框架
* |---- Map:双列数据,存储key-value对的数据 --> 类似于高中的函数y = f(x)
* |---- HashMap:作为Map的主要实现类,线程不安全的,效率高。存储存储key或value时,可以是null值。
* |---- LinkedHashMap:保证在遍历map元素时,可以按照添加的顺序实验遍历。原理和LinkedHashSet类似。对于频繁 * 的遍历操作,效率要高于HashMap
* |---- TreeMap:保证按照添加的key-value对(排序依据是key)进行排序,实现排序遍历。底层使用红黑树
* |---- Hashtable:作为古老的实现类,线程安全的,效率低。存储存储key或value时,不可以是null值
* |---- Properties:常用来处理配置文件。key和value都是String类型
* HashMao的底层:数组 + 链表(JDK7及以前)
* 数组 + 链表 + 红黑树 (JDK8之后)
* */

# Map 结构理解

1
2
3
4
5
6
7
/*
* 三、结构的理解(以HashMap为例,不适用于TreeMap)
* key是不可重复的、无序的,使用Set存储所有的key ---> key所在类要重写equals()和hashCode()方法
* value是可重复的、无序的,使用Collection存储所有的value ---> value所在类要重写equals()
* key和value是被封装成一个entry对象,key和value是entry的两个属性。
* entry是无序的、不可重复的,使用set存储所有的entry
**/

# HashMap 底层实现原理

1
2
3
4
5
6
7
8
9
10
11
12
13
14
15
16
17
18
19
20
21
22
23
24
25
26
27
28
29
/*
四、HashMap底层实现原理,以JDK7为例
* HashMap map = new HashMap();
* 在实例化以后,底层创建了长度是16的一维数组Entry[] table
* ..执行多次put..
* map.put(key1, value1);
* 首先,调用key1所在类的hashCode()方法计算key1的hash值,此hash值经过某种算法计算后,得到在Entry数组中的存放位置
* 如果此位置上的数据为空,此时key1-value1添加成功。如果此位置上的数据不为空(即此位置存在一个或多个数据(以链表存在)),
* 比较当前key1和已存在的一个或多个数据key的hash值:
* 如果key1的hash值与已存在数据的hash都不相同,此时key1-value1添加成功。 ---> 情况2
* 若和某一个数据(key2, value2)的hash值相同,则调用key1所在类的equals()方法:
* 若相同,则添加失败 ----> 情况3
* 若不相同,使用value1替换value2
* 补充:关于情况2和情况3,此时key1-value1和原来的数据以链表方式存储
* 在不断的添加过程中,会涉及到扩容的问题,当超出临界值并且要存放的位置非空时,扩容。
* 默认的扩容方式:扩容为原来容量的2倍,并将原有的数据复制过来。
* JDK8相较于JDK7底层实现方面的不同:
* 1、new HashMap():底层没有创建一个底层为16的数组
* 2、JDK8底层的数组是:Node[],而非Entry[]
* 3、首次调用put()方法时,底层会创建长度为16的数组
* 4、JDK7底层结构只有:数组 + 链表;JDK8底层结构:数组 + 链表 + 红黑树。
* 当数组的某一个索引位置上的元素超过8个时且当前数组的长度超过64时,此时此索引位置上的数据改为使用红黑树存储
* 五、几个概念
* DEFAULT_INITIAL_CAPACITY:HashMap的默认容量:16
* DEFAULT_LOAD_FACTOR:HashMap的默认加载因子:0.75
* threshold:扩容的临界值,= 容量 * 加载因子 = 16 * 0.75 = 12
* TREEIFY_THRESHOLD:Bucket中链表长度大于该默认值,转化为红黑树:8
* MIN_TREEIFY_CAPACITY:Bucket中的Node倍树化时最小的hash表容量:64
**/

# LinkedHashMap 实现原理

1
源码中LinkedHashMap底层链表上的结点Entry继承了HashMap中的结点Node,将其改成了双向链表

# 常用方法

1
2
3
4
5
6
7
8
9
10
11
12
13
14
15
16
17
18
19
20
21
22
23
24
25
26
27
28
29
30
31
32
33
34
35
36
37
38
39
40
41
42
43
44
45
46
47
48
49
50
51
52
53
54
55
56
57
58
59
60
61
62
63
64
65
66
67
68
69
70
71
72
//常用方法
/*
* 添加:put()
* 删除:remove()
* 修改:put()
* 查询:get()
* 长度:size()
* 遍历:keySet(), values(), entrySet()
* */
@Test
public void test2(){
Map map = new HashMap();
//Object put(Object key, Object value)
map.put("AA",123);
map.put(45,123);
//修改操作
map.put("AA",456);
System.out.println(map);//{AA=456, 45=123}
Map map1 = new HashMap();
map1.put("CC",123);
map1.put("DD",123);
//void putAll(Map m)
map.putAll(map1);
System.out.println(map);//{AA=456, CC=123, DD=123, 45=123}
//Object value = remove(Object key)
map.remove("CC");
System.out.println(map);//{AA=456, DD=123, 45=123}
//clear()
map.clear();
System.out.println(map);//{}
System.out.println(map.size());//0
map.put("AA",123);
map.put(45,123);
//Object value = get(Object key)
System.out.println(map.get("AA"));//123
//boolean containsKey(Object key)
System.out.println(map.containsKey("AA"));//true
//boolean containsValue(Object value)
System.out.println(map.containsValue(123));//true
//size()
System.out.println(map.size());//2
//isEmpty()
System.out.println(map.isEmpty());//false
//boolean equals(Object obj):判断当前map和参数对象obj是否相等
//Map没有迭代器
//Set keySet():返回所有key组成的Set
Set set = map.keySet();
for (Object o : set) {
System.out.println(o);
}
//Collection values():返回所有value值构成的集合
Collection values = map.values();
for (Object value : values) {
System.out.println(value);
}
//遍历所有的key-value
//方式一:Set entrySet()
Set set1 = map.entrySet();
for (Object o : set1) {
// System.out.println(o);//可以直接输出
Map.Entry entry = (Map.Entry)o;
System.out.println(entry.getKey() + ", " + entry.getValue());//entry有getKey()和getValue()
}
//方式二
Set keySet = map.keySet();
Iterator iterator = keySet.iterator();
while(iterator.hasNext()){
Object key = iterator.next();
Object value = map.get(key);
System.out.println("key = " + key + ", value = " + value);
}
}

# TreeMap 使用举例

1
2
3
4
5
6
7
8
9
10
11
12
13
14
15
16
17
18
19
20
21
22
23
24
25
26
27
28
29
30
31
32
33
34
35
36
37
38
39
40
41
42
43
44
45
46
47
48
49
50
51
52
53
54
55
import org.junit.Test;

import java.util.*;

/**
* @author DzcGood
* @date 2021/10/3 - 16:33
*/
public class TreeMapTest {
//向TreeMap中添加key-value,要求key必须是由同一个类创建的对象
//因为要按照key进行排序:自然排序,定制排序
//自然排序
@Test
public void test1(){
TreeMap map = new TreeMap();
map.put(new Person("Tom",13), 98);
map.put(new Person("Jack",15), 89);
map.put(new Person("Mike",21), 76);
map.put(new Person("Jerry",9), 100);
Set set = map.entrySet();
Iterator iterator = set.iterator();
while(iterator.hasNext()){
Map.Entry entry = (Map.Entry)iterator.next();
System.out.println(entry.getKey() + " " +entry.getValue());
}
}

//定制排序:使用参数为Comparator的构造器
//按照年龄从大到小排序
@Test
public void test2(){
Map map = new TreeMap(new Comparator() {
@Override
public int compare(Object o1, Object o2) {
if(o1 instanceof Person && o2 instanceof Person){
Person p1 = (Person) o1;
Person p2 = (Person) o2;
return -Integer.compare(p1.getAge(), p2.getAge());
}
throw new RuntimeException("参数不匹配");
}
});
map.put(new Person("Tom",13), 98);
map.put(new Person("Jack",15), 89);
map.put(new Person("Mike",21), 76);
map.put(new Person("Jerry",9), 100);
Set set = map.entrySet();
Iterator iterator = set.iterator();
while(iterator.hasNext()){
Map.Entry entry = (Map.Entry)iterator.next();
System.out.println(entry.getKey() + " " +entry.getValue());
}
}
}

# Properties

1
2
3
4
5
6
7
8
9
10
11
12
13
14
15
16
17
18
19
20
21
22
23
24
25
26
import java.io.FileInputStream;
import java.io.FileNotFoundException;
import java.util.Properties;

/**
* @author DzcGood
* @date 2021/10/3 - 16:49
*/
public class PropertiesTest {
//Properties:常用来处理配置文件,key和value都是String类型
public static void main(String[] args) throws Exception{
Properties properties = new Properties();
FileInputStream fis;
fis = new FileInputStream("jdbc.properties");
properties.load(fis);
String name = properties.getProperty("name");
String password = properties.getProperty("password");
System.out.println("name = " + name + ", password = " + password);//name = Tom, password = abc123
fis.close();
}
}

/**********************
//以下是jdbc.properties文件的内容
name=Tom邓智超
password=abc123

# Collections 工具类

Collecitons 是一个操作 Set、List、Map 等集合的工具类

1
2
3
4
5
6
7
8
9
10
11
12
13
14
15
16
17
18
19
20
21
22
23
24
25
26
27
28
29
30
31
32
33
34
35
36
37
38
39
40
41
42
43
44
45
46
47
48
49
50
51
52
53
54
55
56
57
58
59
60
61
62
63
64
65
66
67
68
69
70
71
72
73
74
75
76
import org.junit.Test;

import java.util.ArrayList;
import java.util.Arrays;
import java.util.Collections;
import java.util.List;

/**
* @author DzcGood
* @date 2021/10/3 - 20:29
*/

/*
* Collections:操作Collection和Map的工具类
* 面试题:Collections和Collection的区别?
* */
public class CollectionsTest {
//常用方法
@Test
public void test1(){
/*
* Collections类中提供了多个synchronizedXxx()方法,该方法可使将指定集合包装成线程同步的集合,从而可以解决多线程并发集合
* 时的线程安全问题。如synchronizedCollection、synchronizedList、synchronizedMap等等。
* 比如List list1 = synchronizedList(list)返回的就是线程安全的list
*
* reverse(List):反转List中元素的顺序
* shuffle(List):使List的元素随机乱序
* sort(List):从小到大自然排序
* sort(List, Comparator):定制排序
* swap(List, i ,j):交换List中索引位置为i和j的元素
* Object max(Collection):自然排序最小值
* Object max(Collection, Comparator):定制排序最大值
* Object min(Collection):自然排序最小值
* Object min(Collection, Comparator):定制排序最小值
* int frequency(Collection, Object):返回出现次数
* void copy(List dest, List src):将src的内容复制到dest
* boolean replaceAll(List list, Object oldValue, Object newVal):将List中所有oldValue换成newValue
*
* */
List list = new ArrayList();
list.add(123);
list.add(523);
list.add(13);
list.add(153);
list.add(3);
list.add(17);
System.out.println(list);//[123, 523, 13, 153, 3, 17]
Collections.reverse(list);
System.out.println(list);//[17, 3, 153, 13, 523, 123]
Collections.shuffle(list);
System.out.println(list);;//[3, 523, 17, 123, 13, 153]
Collections.sort(list);
System.out.println(list);//[3, 13, 17, 123, 153, 523]
Collections.swap(list, 0, 1);
System.out.println(list);//[13, 3, 17, 123, 153, 523]
//一眼就知道是做什么的就不一一举例了。。。。。
}

@Test
public void test2(){
//copy方法可能会出错,举例说明一下
List list = new ArrayList();
list.add(123);
list.add(523);
list.add(13);
list.add(153);
list.add(3);
list.add(17);
// List desc = new ArrayList();
// Collections.copy(desc, list);//会报异常,desc的size比list小的就会报错
List desc = Arrays.asList(new Object[list.size()]);//应该这样写
Collections.copy(desc, list);
System.out.println(desc);
}
}

# 泛型

# 用与不用泛型的对比

1
2
3
4
5
6
7
8
9
10
11
12
13
14
15
16
17
18
19
20
21
22
23
24
25
26
27
28
29
30
31
32
33
34
35
36
37
38
39
40
41
42
43
44
45
46
47
48
49
50
51
52
53
54
55
56
57
58
59
60
61
62
63
64
65
66
67
68
69
import org.junit.Test;

import java.util.*;

/**
* @author DzcGood
* @date 2021/10/4 - 17:17
*/

/*
* 泛型的使用
* 1、JDK5.0新增的特性
* 2、在集合中使用泛型:
* 总结:
* ① 集合接口或集合类在JDK5.0时都修改为带泛型的结构
* ② 在实例化集合类时,可以指明具体的泛型类型
* ③ 指明完以后,在集合类或接口中凡是定义类或接口时,内部结构使用到泛型的位置,都指定为实例化时泛型的类型。
* 如:add(E e) ---> 实例化后: add(Integer e)
* ④ 注意点:泛型的类型必须是类,不能是基本数据类型,需要用到基本数据类型的地方,需要写成包装类
* ⑤ 如果实例化时没有指明泛型的类型,默认类型为java.lang.Object
* */
public class GenericTest {
//再集合中使用泛型之前的情况
@Test
public void test1(){
ArrayList list = new ArrayList();
//需求:存放学生的成绩
list.add(78);
list.add(76);
//问题一:类型不安全
// list.add("Tom");
for (Object score : list) {
//问题二:强转时,可能出现ClassCastException
int stuScore = (int)score;
System.out.println(stuScore);
}
}

//使用泛型的情况
//使用泛型的时候,基本数据类型必须写成包装类的形式
@Test
public void test2(){
// ArrayList<Integer> list = new ArrayList<Integer>();//不能写int
//JDK7新特性,类型推断】
ArrayList<Integer> list = new ArrayList<>();//不能写int
list.add(123);
list.add(456);
//编译时,会进行类型检查,保证数据的安全
// list.add("Tom");//编译不通过
for (Integer score : list) {
//避免了强转操作
System.out.println(score);
}
}

//以HashMap举例
@Test
public void test3(){
Map<String, Integer> map = new HashMap<>();
map.put("Tom", 12);
map.put("Jack", 34);
//类型不符合要求
// map.put(123, "Tom");
//泛型的嵌套
Set<Map.Entry<String, Integer>> set = map.entrySet();
Iterator<Map.Entry<String, Integer>> iterator = set.iterator();
}
}

# 自定义泛型

# 泛型类、泛型接口

1
2
3
4
5
6
7
8
9
10
11
12
13
14
15
16
17
18
19
20
21
22
23
24
25
26
27
28
29
30
31
32
33
34
35
36
37
38
39
40
41
42
43
44
/**
* @author DzcGood
* @date 2021/10/4 - 20:05
*/

/*
* 1、如何自定义泛型结构:泛型类、泛型接口、泛型方法
* 2、关于自定义泛型类、泛型方法
* > 如果定义了泛型类,实例化没有指明类的泛型,则认位此泛型类型为Object类型
* > 建议实例化时指明类的泛型
* > 若子类在继承带泛型的父类时,指明了泛型类型,则子类不再是泛型类。在实例化时,不需要指明泛型
*
* */
public class Order<T> {
String name;
int orderId;
//类的内部结构可以使用类的泛型
T orderT;
public Order(){}

public Order(String name, int orderId, T orderT) {
this.name = name;
this.orderId = orderId;
this.orderT = orderT;
}

public T getOrderT() {
return orderT;
}

public void setOrderT(T orderT) {
this.orderT = orderT;
}
}

class SubOrder<T, E> extends Order<T>{//未指明泛型类型,SubOrder还是泛型类
E name;
}

class SubOrder1 extends Order<Integer>{//指明了泛型类型,SubOrder1不再是泛型类

}


# 泛型方法

1
2
3
4
5
6
7
8
9
10
11
12
13
14
15
16
17
18
19
20
21
22
23
24
25
26
27
28
29
30
31
32
33
34
35
36
37
38
39
40
41
42
43
44
45
46
47
48
49
50
51
52
53
54
import org.junit.Test;

import java.util.ArrayList;
import java.util.Arrays;
import java.util.List;

/**
* @author DzcGood
* @date 2021/10/4 - 21:11
*/

/*
* 自定义泛型方法
* 1、泛型方法可以出现在非泛型类中
* 2、泛型方法:在方法中出现了泛型的结构,泛型参数与类的泛型参数没有任何关系
* 换句话说,泛型方法所属的类是不是泛型都没有关系
* 3、泛型方法可以声明为static,原因:泛型参数是在调用方法时确定的,并非在实例化类时确定
* */
public class GenericMethodTest<T> {
T name;

public void show(T name){//这不是泛型方法!!!!
System.out.println(name);
}

public <E> List<E> copyFromArrayToList(E[] arr){//声明泛型方法:在返回类型前面加上<>
ArrayList<E> list = new ArrayList<>();
for (E e : arr) {
list.add(e);
}
return list;
}

//测试泛型方法
@Test
public void test1(){
GenericMethodTest<String> order = new GenericMethodTest<>();
Integer[] arr = new Integer[]{1,2,3,4};
//泛型方法在调用时,指明泛型参数的类型
List<Integer> list = order.copyFromArrayToList(arr);
System.out.println(list);
}
}


class A{
public static <E> List<E> copyFromArrayToList(E[] arr){//非泛型类也可以定义泛型方法,且可以声明为static
ArrayList<E> list = new ArrayList<>();
for (E e : arr) {
list.add(e);
}
return list;
}
}

# 泛型在继承上的表现

1
2
3
4
5
6
7
8
9
10
11
12
13
14
15
16
17
18
19
20
21
22
23
24
25
26
27
28
29
30
31
32
33
34
35
36
37
38
39
40
41
42
43
44
45
46
47
48
49
50
51
52
53
54
55
56
57
58
59
60
61
62
63
64
65
66
67
68
69
70
71
72
73
74
75
76
77
78
79
80
81
82
83
84
85
86
87
88
89
90
91
92
93
94
95
96
97
98
99
100
101
102
103
104
105
106
107
108
109
110
import org.junit.Test;

import java.lang.reflect.Array;
import java.util.*;

/**
* @author DzcGood
* @date 2021/10/4 - 17:17
*/

/*
* 泛型的使用
* 1、JDK5.0新增的特性
* 2、在集合中使用泛型:
* 总结:
* ① 集合接口或集合类在JDK5.0时都修改为带泛型的结构
* ② 在实例化集合类时,可以指明具体的泛型类型
* ③ 指明完以后,在集合类或接口中凡是定义类或接口时,内部结构使用到泛型的位置,都指定为实例化时泛型的类型。
* 如:add(E e) ---> 实例化后: add(Integer e)
* ④ 注意点:泛型的类型必须是类,不能是基本数据类型,需要用到基本数据类型的地方,需要写成包装类
* ⑤ 如果实例化时没有指明泛型的类型,默认类型为java.lang.Object
* 3、如何自定义泛型结构:泛型类、泛型接口、泛型方法
* */
public class GenericTest {
//再集合中使用泛型之前的情况
@Test
public void test1(){
ArrayList list = new ArrayList();
//需求:存放学生的成绩
list.add(78);
list.add(76);
//问题一:类型不安全
// list.add("Tom");
for (Object score : list) {
//问题二:强转时,可能出现ClassCastException
int stuScore = (int)score;
System.out.println(stuScore);
}
}

//使用泛型的情况
//使用泛型的时候,基本数据类型必须写成包装类的形式
@Test
public void test2(){
// ArrayList<Integer> list = new ArrayList<Integer>();//不能写int
//JDK7新特性,类型推断】
ArrayList<Integer> list = new ArrayList<>();//不能写int
list.add(123);
list.add(456);
//编译时,会进行类型检查,保证数据的安全
// list.add("Tom");//编译不通过
for (Integer score : list) {
//避免了强转操作
System.out.println(score);
}
}

//以HashMap举例
@Test
public void test3(){
Map<String, Integer> map = new HashMap<>();
map.put("Tom", 12);
map.put("Jack", 34);
//类型不符合要求
// map.put(123, "Tom");
//泛型的嵌套
Set<Map.Entry<String, Integer>> set = map.entrySet();
Iterator<Map.Entry<String, Integer>> iterator = set.iterator();
}

/*
* 泛型在继承方面的体现
* 类A是类B的父类,G<A> 和G<B>不具备子父类关系,二者是并列关系,不能相互赋值
* 类A是类B的父类,A<G> 和 B<G>具有子父类关系
* */
@Test
public void test4(){
Object obj = null;
String str = null;
obj = str;

Object[] arr1 = null;
String[] arr2 = null;
arr1 = arr2;

List<Object> list1 = null;
List<String> list2 = new ArrayList<>();
//此时list1和list2的类型不具有子父类关系,编译不通过
// list1 = list2;//报错
/*
* 原因:假设可以编译通过,则list1和list2指向同一个list对象,通过list1.add()可以添加非String类型的对象到list对象
* */

Date date = new Date();
// str = date;//这两个报错信息的原理其实是一样的

show(list1);
// show(list2);//报错,原理同上

List<String> list3 = null;
ArrayList<String> list4 = null;
list3 = list4;//可以赋值,类A是类B的父类,A<G> 和 B<G>具有子父类关系

}

public void show(List<Object> list){

}
}

# 通配符的使用

1
2
3
4
5
6
7
8
9
10
11
12
13
14
15
16
17
18
19
20
21
22
23
24
25
26
27
28
29
30
31
32
33
34
35
	@Test
public void test(){
/*
* 通配符的使用
* 通配符: ?
* 类A是类B的父类,G<A>和G<B>是并列关系,二者共同的父类是G<?>
* 通配符的其他形式:
* ? extends A表示A及A的子类,G<? extends A>可以是G<A>和G<B>的父类,其中B是A的子类
* ? super A表示A及A的父类,G<? extends A>可以是G<A>和G<B>的父类,其中B是A的
* */

List<Object> list1 = null;
List<String> list2 = null;
List<?> list3 = null;
list3 = list1;//可以赋值
list3 = list2;//可以赋值

List<String> list4 = new ArrayList<>();
list4.add("AA");
list3 = list4;
//添加:对于List<?>就不能向其内部添加数据,
//但是可以添加null
// list3.add("DD");//报错,类型不匹配
list3.add(null);//只能添加null
//获取(读取):允许读取数据
Object o = list3.get(0);//读出来的是Object类型

}

public void print(List<?> list){
Iterator<?> iterator = list.iterator();
for (Object o : list) {
System.out.println(o);
}
}

# IO 流

# File 类的使用

1
2
3
4
5
6
7
8
9
10
11
12
13
14
15
16
17
18
19
20
21
22
23
24
25
26
27
28
29
30
31
32
33
34
35
36
37
38
39
40
41
42
43
44
45
46
47
48
49
50
51
52
53
54
55
56
57
58
59
60
61
62
63
64
65
66
67
68
69
70
71
72
73
74
75
76
77
78
79
80
81
82
83
84
85
86
87
88
89
90
91
92
93
94
95
96
97
98
99
100
101
102
103
104
105
106
107
108
109
110
111
112
113
114
115
116
117
118
119
120
121
122
123
124
125
126
127
128
129
130
131
132
133
134
135
136
137
138
139
140
141
142
143
144
145
146
147
148
149
150
151
152
153
154
155
156
157
158
159
160
161
162
163
164
165
166
167
168
169
import org.junit.Test;

import java.io.File;
import java.io.IOException;

/**
* @author DzcGood
* @date 2021/10/5 - 22:07
*/

/*
* File类的使用
* 1、File类的一个对象,代表一个文件或一个文件目录(俗称:文件夹)
* 2、File类声明在java.io下
* 3、File类中涉及到关机文件或文件目录的创建、删除、重命名、修改时间、文件大小等方法,并未涉及到写入或读取文件内容的操作,
* 如果需要读取或写入文件内容,必须使用IO流来完成
* 4、后续File类对象通常会作为参数传递到流的构造器中,指明读取或写入的“目标”
* */
public class FileTest {
/*
* 1、如何创建File类对象
* 2、
* 相对路径:相较于某个路径下,指明的路径
* 绝对路径:包含盘符在内的文件或文件目录的路径
* 3、路径分隔符和系统有关
* windows和dos系统中,是'\'
* Unix和URL中,是'/'
* */
@Test
public void test1(){
//构造器一:File(String pathName)
File file1 = new File("hello.txt");//表示在当前路径下的hello.txt文件
File file2 = new File("G:\\JAVA\\learn\\day23");
// File.separatorChar:如果不记得是'\'还是'/',可以使用File.separatorChar
System.out.println(file1);
System.out.println(file2);//尽管磁盘中没有这个文件/目录,也不会报错

//构造器二:File(String parent, String child):在parent路径下新建child路径/文件
File file3 = new File("G:\\JAVA\\learn\\day23", "JavaSenior");
System.out.println(file3);//G:\JAVA\learn\day23\JavaSenior

//构造器三:File(File parent, String child):类似于构造器二
File file4 = new File(file3, "hello.txt");
System.out.println(file4);//G:\JAVA\learn\day23\JavaSenior\hello.txt
}

/*
* File类常用方法
* 1、public String getAbsolutePath():获取绝对路径
* 2、public String getPath():获取路径
* 3、public String getName():获取名称
* 4、public String getParent():获取上层文件目录路径,若无,返回null
* 5、public long length():获取文件长度(即:字节数)。不能获取目录的长度
* 6、public long lastModified():获取最后一次的修改时间,毫秒值
* 如下的两个方法适用于文件目录
* 7、public String[] list():获取指定目录下的所有文件或者文件目录的名称数组
* 8、public File[] listFiles():获取指定目录下的所有文件或者文件目录的File数组
* */
@Test
public void test2(){
File file1 = new File("hello.txt");
File file2 = new File("G:\\JAVA\\learn\\day23\\JavaSenior\\hello.txt");
System.out.println(file1.getAbsolutePath());//G:\JAVA\learn\day23\hello.txt
System.out.println(file1.getPath());//hello.txt
System.out.println(file1.getName());//hello.txt
System.out.println(file1.getParent());//null,以相对路径创建的file不能获取parent
System.out.println(file1.length());//0,因为文件不存在
System.out.println(file1.lastModified());//0。因为文件不存在

System.out.println();

System.out.println(file2.getAbsolutePath());//G:\JAVA\learn\day23\JavaSenior\hello.txt
System.out.println(file2.getPath());//G:\JAVA\learn\day23\JavaSenior\hello.txt
System.out.println(file2.getName());//hello.txt
System.out.println(file2.getParent());//G:\JAVA\learn\day23\JavaSenior
System.out.println(file2.length());
System.out.println(file2.lastModified());

File file = new File("G:\\JAVA\\learn\\day23");
String[] list = file.list();
for (String s : list) {
//day23.iml src test
System.out.print(s + " ");
}
System.out.println();
File[] files = file.listFiles();
for (File file3 : files) {
//G:\JAVA\learn\day23\day23.iml G:\JAVA\learn\day23\src G:\JAVA\learn\day23\test
System.out.print(file3 + " ");
}
}

/*
* public boolean renameTo(File desc):把文件重命名喂指定的文件路径
* 比如:file1.renameTo(file2)
* 要想保证操作成功:必须保证file1必须存在于硬盘中,且file2不能在硬盘中存在
* */
@Test
public void test3(){
File file1 = new File("hello.txt");
File file2 = new File("E:\\hi.txt");
boolean renameTo = file1.renameTo(file2);
}

/*
* 判断相关
* public boolean isDirectory():是否是文件目录
* public boolean isFile():是否是文件
* public boolean exists():是否存在
* public boolean canRead():是否可读
* public boolean canWrite():是否可写
* public boolean isHidden():是否隐藏
* */
@Test
public void test4(){
File file = new File("hello.txt");
System.out.println(file.isFile());//true
System.out.println(file.isDirectory());//false
System.out.println(file.exists());//true
System.out.println(file.canRead());//true,目录也是可读可写的
System.out.println(file.canWrite());//true
System.out.println(file.isHidden());//false
}

/*
* 增删相关
* public boolean createNewFile():若文件不存在,则创建文件
* public boolean mkdir():创建目录,若目录存在或上级目录不存在,则不创建
* public boolean mkdirs():创建目录,若上级目录不存在,则一并创建
* public boolean delete():删除文件或文件夹,若要删除一个目录,必须保证该目录下没有别的文件和目录
* */
@Test
public void test5(){
//文件的创建与删除
File file = new File("hello1.txt");
if(!file.exists()){
try {
file.createNewFile();
System.out.println("创建成功");
} catch (IOException e) {
e.printStackTrace();
}
}else{
file.delete();
System.out.println("删除成功");
}
//目录的创建与删除
//父目录存在的情况下
File file1 = new File("G:\\JAVA\\learn\\day23\\createDirectoryTest");
if(!file1.exists()){
file1.mkdir();
System.out.println("创建成功");
}else{
file1.delete();
System.out.println("删除成功");
}

//父目录不存在的情况下,使用mkdirs()
File file2 = new File("G:\\JAVA\\learn\\day23\\createDirectoryTest1\\test");
if(!file2.exists()){
file2.mkdirs();
System.out.println("创建成功");
}else{
file2.delete();
System.out.println("删除成功");
}
}
}

# 流的体系结构

1
2
3
4
5
6
7
8
9
10
11
12
/*
* 一、流的分类
* 1、按照操作数据单位:字节流、字符流
* 2、按照数据的流向:输入流、输出流
* 3、流的角色:节点流、处理流
* 二、流的体系结构
* 抽象基类 节点流 缓冲流(处理流中的一种)
* InputStream FileInputStream BufferedInputStream
* OutputStream FileOutputStream BufferedOutputStream
* Reader FileReader BufferedReader
* Writer FileWriter BufferedWriter
* */

# FileReader 与 FileWriter

1
2
3
4
5
6
7
8
9
10
11
12
13
14
15
16
17
18
19
20
21
22
23
24
25
26
27
28
29
30
31
32
33
34
35
36
37
38
39
40
41
42
43
44
45
46
47
48
49
50
51
52
53
54
55
56
57
58
59
60
61
62
63
64
65
66
67
68
69
70
71
72
73
74
75
76
77
78
79
80
81
82
83
84
85
86
87
88
89
90
91
92
93
public class FileReaderWriterTest {//字符流不能用于处理图片等字节流文件
//FileReader的使用
@Test
public void test1() {
/*
* 将day23下的hello.txt文件内容读入程序中,并输出到控制台
* 说明:
* > 为了保证流资源一定可以执行关闭操作,需要使用try-catch-finally处理
* > 读入的文件一定要存在,否则就会报FileNotFoundException
* */
//1、实例化File类的对象,指明要操作的文件
File file = new File("hello.txt");//相较于当前Module
FileReader fileReader = null;
try {
//2、提供具体的流
fileReader = new FileReader(file);
//3、数据的读入
//int read():返回读入的一个字符,如果达到文件末尾,返回-1
int data;
while((data = fileReader.read()) != -1){
System.out.print((char)data);
}
} catch (IOException e) {
e.printStackTrace();
} finally {
//4、流的关闭操作
try {
if(fileReader != null)
fileReader.close();
} catch (IOException e) {
e.printStackTrace();
}
}
}

//使用read()重载的方法
@Test
public void test2(){
File file = new File("hello.txt");
FileReader fileReader = null;
try {
fileReader = new FileReader(file);
char[] cbuf = new char[5];
int len;
//read(char[] cbuf):返回每次读入cbuf数组中的字符的个数,如果达到文件末尾,返回-1
while((len = fileReader.read(cbuf)) != -1){//难点,需要特别注意len的作用
for (int i = 0; i < len; i++) {
System.out.print(cbuf[i]);
}
// for (char c : cbuf) {//错误的写法
// System.out.print(c);
// }
}
} catch (IOException e) {
e.printStackTrace();
} finally {
try {
if (fileReader != null)
fileReader.close();
} catch (IOException e) {
e.printStackTrace();
}
}
}

//向写入写入数据
/*
* 1、若要写入的文件不存在,则会自动创建文件
* 2、若要写入的文件存在,则取决于FileWriter构造器中的append参数取值,取值为true,则为追加方式,为false则为覆盖方式
* */
@Test
public void test3(){
//1、提供File类的对象,指明写出到的文件
File file = new File("hello1.txt");
FileWriter fileWriter = null;//以覆盖方式写入文件
try {
//2、提供FileWriter类的对象,用于数据的写出
fileWriter = new FileWriter(file, false);
//3、写出的操作
fileWriter.write("I have a dream \n");
fileWriter.write("You need to have a dream \n");
} catch (IOException e) {
e.printStackTrace();
} finally {
if (fileWriter != null)
try {
fileWriter.close();//4、流资源的关闭
} catch (IOException e) {
e.printStackTrace();
}
}
}
}

# FileInputStream 与 FileOutputStream

1
2
3
4
5
6
7
8
9
10
11
12
13
14
15
16
17
18
19
20
21
22
23
24
25
26
27
28
29
30
31
32
33
34
35
36
37
38
39
40
41
42
43
44
45
46
47
48
49
50
51
52
53
54
55
56
57
58
59
60
61
62
63
64
65
66
67
68
69
70
71
72
73
74
75
76
77
78
79
80
81
82
83
84
85
86
87
88
89
import org.junit.Test;

import java.io.File;
import java.io.FileInputStream;
import java.io.FileOutputStream;
import java.io.IOException;

/**
* @author DzcGood
* @date 2021/10/6 - 20:52
*/

/*
* FileInputStream与FileOutputStream的使用
* */
public class FileInputOutputStreamTest {
/*
* 字节流不能用来读取单个字符长度超过1字节的文本文件
* 结论:对于文本文件(.txt\.java\.cpp),使用字符流处理;
* 对于非文本文件(.jpg\.mp3\.avi\.doc\.ppt等),使用字节流处理
* */
@Test
public void test1(){
File file = new File("hello.txt");
FileInputStream fileInputStream = null;
try {
fileInputStream = new FileInputStream(file);
byte[] buffer = new byte[5];
int len;
while((len = fileInputStream.read(buffer)) != -1){
String s = new String(buffer, 0 ,len);
System.out.print(s);
}
} catch (IOException e) {
e.printStackTrace();
} finally {
if(fileInputStream != null){
try {
fileInputStream.close();
} catch (IOException e) {
e.printStackTrace();
}
}
}

}

/*
* 实现一张图片的复制操作
* */
@Test
public void test2(){
//建File
File src = new File("花.jpg");
File dest = new File("花_copy.jpg");
//建流类
FileInputStream fileInputStream = null;
FileOutputStream fileOutputStream = null;
try {
fileInputStream = new FileInputStream(src);
fileOutputStream = new FileOutputStream(dest);
byte[] buffer = new byte[5];
int len;
//复制的过程
while((len = fileInputStream.read(buffer)) != -1){
fileOutputStream.write(buffer, 0 ,len);
}
} catch (IOException e) {
e.printStackTrace();
} finally {
//关闭
if(fileInputStream != null){
try {
fileInputStream.close();
} catch (IOException e) {
e.printStackTrace();
}
}
if(fileOutputStream != null){
try {
fileOutputStream.close();
} catch (IOException e) {
e.printStackTrace();
}
}
}
}
}

# 缓冲流

1
2
3
4
5
6
7
8
9
10
11
12
13
14
15
16
17
18
19
20
21
22
23
24
25
26
27
28
29
30
31
32
33
34
35
36
37
38
39
40
41
42
43
44
45
46
47
48
49
50
51
52
53
54
55
56
57
58
59
60
61
62
63
64
65
66
67
68
69
70
71
72
73
74
75
76
77
78
79
80
81
82
83
84
85
86
87
88
89
90
91
92
93
94
95
96
97
98
99
100
101
102
import org.junit.Test;

import java.io.*;

/**
* @author DzcGood
* @date 2021/10/6 - 21:43
*/

/*
* 缓冲流的使用
* 1、缓冲流:BufferedInputStream、BufferedOutputStream、BufferedReader、BufferedWriter
* 2、作用:提升流读取、写入的速度
* 3、处理流,就是”套接“在已有的流的基础上
* */
public class BufferedTest {
/*
* 实现非文本文件的复制
* */
@Test
public void test1(){
//造文件
File src = new File("花.jpg");
File dest = new File("花_copy2.jpg");
BufferedInputStream bufferedInputStream = null;
BufferedOutputStream bufferedOutputStream = null;
try {
//造流:处理流作用在节点流之上
bufferedInputStream = new BufferedInputStream(new FileInputStream(src));
bufferedOutputStream = new BufferedOutputStream(new FileOutputStream(dest));
//复制的细节
byte[] buffer = new byte[10];
int len;
while((len = bufferedInputStream.read(buffer))!= -1){
bufferedOutputStream.write(buffer, 0, len);
// bufferedOutputStream.flush();//刷新缓冲区
}
} catch (IOException e) {
e.printStackTrace();
} finally {
//关闭流
// 原则上,四个都要关,先关闭处理流,再关闭节点流
// 特性:在关闭外层流的同时,内层流也会自动关闭,所以只关闭处理流即可
try {
if(bufferedInputStream != null)
bufferedInputStream.close();
} catch (IOException e) {
e.printStackTrace();
}
try {
if (bufferedOutputStream != null) {
bufferedOutputStream.close();
}
} catch (IOException e) {
e.printStackTrace();
}
}
}

//BufferedReader和BufferedWriter的使用
@Test
public void test2(){
BufferedReader bufferedReader = null;
BufferedWriter bufferedWriter = null;
try {
//造对象
bufferedReader = new BufferedReader(new FileReader(new File("hello.txt")));
bufferedWriter = new BufferedWriter(new FileWriter(new File("hello_copy.txt")));
char[] cbuf = new char[5];
//方法一
/*int len;
//读写操作
while((len = bufferedReader.read(cbuf))!= -1){
bufferedWriter.write(cbuf,0,len);
// bufferedWriter.flush();
}*/
//方法二:使用String
String str;
while((str = bufferedReader.readLine()) != null){//这个方法读不出来换行符
bufferedWriter.write(str + '\n');//手动添加换行符
// bufferedWriter.newLine();//添加换行符,和手动添加'\n'效果相同
}
} catch (IOException e) {
e.printStackTrace();
} finally {
//关闭资源
if (bufferedReader != null)
try {
bufferedReader.close();
} catch (IOException e) {
e.printStackTrace();
}
if (bufferedWriter != null)
try {
bufferedWriter.close();
} catch (IOException e) {
e.printStackTrace();
}
}
}
}

# 转换流

1
2
3
4
5
6
7
8
9
10
11
12
13
14
15
16
17
18
19
20
21
22
23
24
25
26
27
28
29
30
31
32
33
34
35
36
37
38
39
40
41
42
43
44
45
46
47
48
49
50
51
52
53
54
55
56
57
58
59
60
61
62
63
64
65
66
67
68
import org.junit.Test;

import java.io.*;

/**
* @author DzcGood
* @date 2021/10/8 - 1:23
*/

/*
* 处理流二:转换流
* 1、属于字符流
* 2、包括
* > InputStreamReader:将一个字节的输入流转换为字符的输入流
* > OutputStreamWriter:将一个字符的输出流转换为字节的输出流
* 3、作用:提供字节流与字符流之间的转换
* 4、解码:字节、字节数组 ---> 字符数组、字符串
* 编码:字符数组、字符串---> 字节、字节数组
* 5、字符集:
* > ASCII:美国标准信息交换码,用一个字节的7位表示
* > ISO8859-1:拉丁码表,欧洲码表,用一个字节的8位表示
* > GB2312:中国的中文编码表,最多两个字节编码所有字符
* > GBK:中国的中文编码表升级,融合了更多的中文文字符号,最多两个字节编码
* > Unicode:国际标准码,融合了目前人类使用的所有字符,为每一个字符分配唯一的字符码,每个字符使用2字节
* > UTF-8:变长的编码方式,可用1-4个字节来表示一个字符
* > ANSI:系统默认字符集,英文系统是ISO8859-1,中文操作系统是GBK
* */
public class ChangeStreamTest {
/*
* InputStreamReader的使用:实现字节输入流到字符流的转换
* 应该使用try-catch-finally处理异常,这里懒得写了,直接throws IOException
* */
@Test
public void test1() throws IOException {
FileInputStream fis = new FileInputStream(new File("hello.txt"));
// InputStreamReader isr = new InputStreamReader(fis);//使用系统默认字符集
//参数2指明了字符集,根据文件的编码字符集选择解码字符集
InputStreamReader isr1 = new InputStreamReader(fis, "UTF-8");//使用系统默认字符集
char[] cbuf = new char[20];
int len;
while((len = isr1.read(cbuf))!= -1){
String str = new String(cbuf, 0, len);
System.out.print(str);
}
isr1.close();
}

/*
* InputStreamReader和OutputStreamWriter的综合使用:读取utf-8的文件,并以gbk编码存储
* 应该使用try-catch-finally处理异常,这里懒得写了,直接throws IOException
* */
@Test
public void test2() throws IOException{
InputStreamReader isr = new InputStreamReader(new FileInputStream(new File("hello.txt")));
//以GBK字符集写入
OutputStreamWriter osw = new OutputStreamWriter(new FileOutputStream(new File("hello_gbk.txt")),"GBK");
char[] cbuf = new char[20];
int len;
while ((len = isr.read(cbuf)) != -1){
String s = new String(cbuf, 0, len);
osw.write(s);
System.out.print(s);
}
isr.close();
osw.close();
}
}

# 标准输入输出流

1
2
3
4
5
6
7
8
9
10
11
12
13
14
15
16
17
18
19
20
21
22
23
24
25
26
27
28
29
30
31
32
33
34
35
36
37
38
39
40
41
42
43
44
45
46
47
48
49
50
51
52
53
54
55
56
57
58
59
import org.junit.Test;

import java.io.BufferedInputStream;
import java.io.BufferedReader;
import java.io.IOException;
import java.io.InputStreamReader;

/**
* @author DzcGood
* @date 2021/10/8 - 23:32
*/

/*
* 其它流的使用
* 1、标准输入、输出流
* 2、打印流
* 3、数据流
* */
public class OtherStreamTest {

/*
* 1、标准的输入、输出流
* System.in:标准的输入流,默认从键盘输入
* System.out:标准的输出流,默认从控制台输出
* 2、System类的setIn(InputStream)和setOut(PrintStream)可以使输入输出重定向
* 3、练习:从键盘输入字符串直到e或者exit时退出,将输入的字符串转成大写输出
* > 方法一:使用Scanner实现,调用next()返回字符串
* > 方法二:使用System.in实现:System.in ---> 转换流 ---> BufferedInputStream中的readLine()
* */
public static void main(String[] args) {
//@Test中不能进行输入输出操作,所以放在main中
BufferedReader br = null;
try {
InputStreamReader isr = new InputStreamReader(System.in);
br = new BufferedReader(isr);
while(true){
System.out.println("请输入字符串");
String data = br.readLine();
if("e".equalsIgnoreCase(data) || "exit".equalsIgnoreCase(data)){
System.exit(0);
System.out.println("程序结束");
}
String upperCase = data.toUpperCase();
System.out.println(upperCase);
}
} catch (IOException e) {
e.printStackTrace();
} finally {
if (br != null){
try {
br.close();
} catch (IOException e) {
e.printStackTrace();
}
}
}
}
}

# 打印流

1
2
3
4
5
6
7
8
9
10
11
12
13
14
15
16
17
18
19
20
21
22
23
24
25
26
27
28
29
30
31
32
33
34
import org.junit.Test;

import java.io.File;
import java.io.FileOutputStream;
import java.io.IOException;
import java.io.PrintStream;

/**
* @author DzcGood
* @date 2021/10/9 - 16:32
*/
/*
* 打印流的使用
* PrintStream和PrintWriter
* 1、提供了一系列重载的print()和printLine()方法
* */
public class PrintStreamTest {
//练习:重定向控制台的输出到test.txt
@Test
public void test() throws IOException {
//创建打印流,autoFlush设置为true(写入换行符或字节'\n'都会刷新缓冲区)
PrintStream ps = new PrintStream(new FileOutputStream("test.txt"), true);
if(ps != null){
System.setOut(ps);
}
for (int i = 0; i <= 255; i++) {//如果没有重定向,则是输出到控制台
System.out.print((char)i);//调用重载的print(char)方法,如果不强转,调用的是print(int)
if (i % 50 == 0){
System.out.println();
}
}
}
}

# 数据流

1
2
3
4
5
6
7
8
9
10
11
12
13
14
15
16
17
18
19
20
21
22
23
24
25
26
27
28
29
30
31
32
33
34
35
36
37
38
39
40
41
42
43
44
45
46
47
48
49
50
51
import org.junit.Test;

import java.io.*;

/**
* @author DzcGood
* @date 2021/10/9 - 16:54
*/

/*
* 数据流的使用:用于读取或写出基本数据类型的变量或字符串
* 1、DataInputStream和DataOutputStream
* 2、DataInputStream中的方法
* > readBoolean > readByte
* > readChar > readFloat
* > readDouble > readShort
* > readLong > readInt
* > readUTF > readFully(byte[] b)
* 3、DataOutputStream中的方法
* 把DataInputStream中的方法的read改成write即可
* 4、注意点:
* 5、缺点:无法存取对象,解决方法:使用对象流
* */
public class DataStreamTest {
//将内存中的字符串、基本数据类型的变量写出到文件data.txt中
@Test
public void test() throws IOException {
//造流类
DataOutputStream dataOutputStream = new DataOutputStream(new FileOutputStream(new File("data.txt")));
//写数据
dataOutputStream.writeUTF("数据输出流测试");
dataOutputStream.flush();//刷新缓冲区,立刻写入
dataOutputStream.writeInt(123);
dataOutputStream.writeChar('a');
//关闭
dataOutputStream.close();
}

//将文件中存储的基本数据类型变量和字符串读取到内存中
@Test
public void test2() throws IOException{
//造流类
DataInputStream dataInputStream = new DataInputStream(new FileInputStream(new File("data.txt")));
//读取:必须按照写入的顺序读取
System.out.println(dataInputStream.readUTF());
System.out.println(dataInputStream.readInt());
System.out.println(dataInputStream.readChar());
dataInputStream.close();
}
}

# 对象流

1
2
3
4
5
6
7
8
9
10
11
12
13
14
15
16
17
18
19
20
21
22
23
24
25
26
27
28
29
30
31
32
33
34
35
36
37
38
39
40
41
42
43
44
45
46
47
48
49
50
51
52
53
54
55
56
57
58
59
60
61
62
63
64
65
66
67
68
69
70
71
72
73
74
75
76
77
78
79
80
81
82
83
84
85
86
87
88
89
90
91
92
93
94
95
96
97
98
99
100
101
102
103
104
105
106
107
108
109
110
111
112
113
114
115
116
117
118
119
120
121
122
123
124
125
126
127
128
129
130
131
132
133
134
135
136
137
138
139
140
141
142
143
144
145
146
147
148
import org.junit.Test;

import java.io.*;

/**
* @author DzcGood
* @date 2021/10/10 - 0:45
*/

/*
* 对象流的使用
* 1、ObjectInputStream和ObjectOutputStream
* 2、用于存储和读取基本数据类型诗句或对象的处理流。可以把Java中的对象写入到数据源中,也能把对象从数据源中还原回来
* 3、自定义类实现序列化和反序列化的操作:需要实现Serializable接口,提供public static final long serialVersionUID
* > 凡是标识为Serializable的类,就表示该类是可序列化的
* > Serializable接口下没有具体要实现的方法
* > 如果不提供serialVersionUID,java运行环境会根据类的内部细节自动生成一个,但是若当前的类发生了变化,serialVersionUID
* 可能发生变化,导致在反序列化的时候出问题。所以建议显示声明
* > 除了被序列化的类声明为serializable,其内部所有属性也必须是可序列化的(基本数据类型默认都是可视化的)
* > 声明为static或transient的属性不能被序列化
*
* */
public class ObjectStreamTest {
/*
* 序列化过程:将内存中的java对象保存到磁盘中或通过网络传输出去
* 使用ObjectOutputStream
* */
@Test
public void test1() throws IOException {
ObjectOutputStream oos = null;//序列化过程
try {
//造对象
oos = new ObjectOutputStream(new FileOutputStream("Object.dat"));
//写数据
oos.writeObject(new String("我爱浙江"));
oos.writeObject(new Person("Tom", 12));//自定义类的序列化
oos.flush();
} catch (IOException e) {
e.printStackTrace();
} finally {
if (oos != null){
try {
//关闭
oos.close();
} catch (IOException e) {
e.printStackTrace();
}
}
}
}

/*
* 反序列化:将磁盘文件中的对象还原为内存中的一个java对象
* 使用ObjectInputStream来实现
* */
@Test
public void test2(){
ObjectInputStream ois = null;
try {
//造对象
ois = new ObjectInputStream(new FileInputStream("Object.dat"));
//读数据,写的时候是什么顺序,读的时候就是什么顺序。
//开发中,一般都是同一类数据
String str = (String)ois.readObject();
Person person = (Person)ois.readObject();//自定义对象的反序列化
System.out.println(str);
System.out.println(person);
} catch (IOException e) {
e.printStackTrace();
} catch (ClassNotFoundException e) {
e.printStackTrace();
} finally {
if(ois != null){
try {
//关闭流
ois.close();
} catch (IOException e) {
e.printStackTrace();
}
}
}
}
}


import java.io.Serializable;
import java.util.Objects;

/**
* @author DzcGood
* @date 2021/10/10 - 1:19
*/

/*
* 自定义类实现序列化和反序列化的操作:需要实现Serializable接口
* */
public class Person implements Serializable {
public static final long serialVersionUID = 453897528957842985L;
String name;
int age;

public Person() {
}

public Person(String name, int age) {
this.name = name;
this.age = age;
}

@Override
public boolean equals(Object o) {
if (this == o) return true;
if (o == null || getClass() != o.getClass()) return false;
Person person = (Person) o;
return age == person.age && Objects.equals(name, person.name);
}

@Override
public int hashCode() {
return Objects.hash(name, age);
}

public String getName() {
return name;
}

public void setName(String name) {
this.name = name;
}

public int getAge() {
return age;
}

public void setAge(int age) {
this.age = age;
}

@Override
public String toString() {
return "Person{" +
"name='" + name + '\'' +
", age=" + age +
'}';
}
}

# 随机存取文件流

1
2
3
4
5
6
7
8
9
10
11
12
13
14
15
16
17
18
19
20
21
22
23
24
25
26
27
28
29
30
31
32
33
34
35
36
37
38
39
40
41
42
43
44
45
46
47
48
49
50
51
52
53
54
55
56
57
58
59
60
61
62
63
64
65
66
67
68
69
70
71
72
73
74
75
76
77
78
79
80
81
82
import org.junit.Test;

import java.io.File;
import java.io.IOException;
import java.io.RandomAccessFile;

/**
* @author DzcGood
* @date 2021/10/10 - 2:33
*/

/*
* RandomAccessFile类的使用
* 1、既可以作为输入流,又可以作为输出流(建议造两个对象,一个表示输入,一个表示输出)
* 2、mode
* > r 以只读的方式打开
* > rw 可以读也可以写
* > rws 可读写,同步文件内容和元数据的更新
* > rwd 可读写,同步文件内容的更新
* 3、作为输出流时,如果写入的文件不存在,则会自动创建
* 若写入的文件存在,则默认从头开始覆盖
* 4、seek(int pos)方法可以定位指针位置
* */
public class RandomAccessFileTest{
@Test
public void test() throws IOException {
RandomAccessFile randomAccessFile = null;
RandomAccessFile randomAccessFile1 = null;
try {
randomAccessFile = new RandomAccessFile(new File("花.jpg"), "r");
randomAccessFile1 = new RandomAccessFile(new File("花_randomCopy.jpg"), "rw");
byte[] buffer = new byte[1024];
int len;
while ((len = randomAccessFile.read(buffer)) != -1) {
randomAccessFile1.write(buffer, 0, len);
}
} catch (IOException e) {
e.printStackTrace();
} finally {
if (randomAccessFile != null) {
try {
randomAccessFile.close();
} catch (IOException e) {
e.printStackTrace();
}
}
if (randomAccessFile1 != null) {
try {
randomAccessFile1.close();
} catch (IOException e) {
e.printStackTrace();
}
}
}
}

@Test
public void test2() throws IOException{
RandomAccessFile rw = new RandomAccessFile("randomTest.txt", "rw");
rw.seek(3);//将指针调到角标为3的位置,角标是从0开始的
//其实write执行的就是覆盖的操作
// rw.write("xyz".getBytes());//因为参数是byte[],这里执行的是覆盖
//下面实现插入(而不是覆盖),先复制后面部分,然后执行写入,最后把复制好的再写入到文件后面
//1、保存指针3后面的数据到StringBuilder中
byte[] buffer = new byte[20];
//使用StringBuilder,长度设置为文件长度
StringBuilder builder = new StringBuilder((int)new File("randomTest.txt").length());
int len;
while((len = rw.read(buffer))!= -1){
builder.append(new String(buffer, 0 , len));
}
//读取完后,指针指向文件末尾,所以要重新定位
rw.seek(3);
//写入要插入的字符串
rw.write("xyz".getBytes());
//写入刚才复制的字符串
rw.write(builder.toString().getBytes());//StringBuilder没有getBytes()方法,所以先转换成String再调用toString()
//关闭流
rw.close();
}
}

# NIO.2 中 Path、Paths、Files 类的使用

1
2
3
4
5
6
7
8
9
10
11
12
13
/**
* @author DzcGood
* @date 2021/10/10 - 14:51
*/

/*
* Path、Paths、Files类的使用
* 1、Path类用于替换File类
* 2、Paths.get(String path)用于获取Path类的实例
* 3、Files是工具类,有一些操作文件目录的方法
* */
public class NIO2Test {
}

# 网络编程

# InetAddress 类的使用

1
2
3
4
5
6
7
8
9
10
11
12
13
14
15
16
17
18
19
20
21
22
23
24
25
26
27
28
29
30
31
32
33
34
35
36
37
38
39
40
41
42
43
44
45
46
47
48
import java.net.InetAddress;
import java.net.UnknownHostException;

/**
* @author DzcGood
* @date 2021/10/10 - 15:29
*/

/*
* 一、网络编程中有两个主要的问题:
* 1、如何准确地定位网络上一台或多态主机;定位主机上的特定的应用
* 2、找到主机后如何可靠高效地进行数据传输
* 二、网络编程中的两个要素:
* 1、对应问题一:IP和端口号
* 2、对应问题二:提供网络通信协议:TCP/IP参考模型
* 三、通信要素一:IP和端口号
* 1、IP:唯一标识Internet上的计算机(通信实体)
* 2、在Java中使用InetAddress类代表IP
* 3、IP分类:IPv4和IPv6;万维网和局域网
* 4、本地回路地址:127.0.0.1,对应着localhost
* 6、如何实例化InetAddress:两个方法①getByName() ②getLocalHost
* 两个常用方法:①getHostName() ②getHostAddress()
* 7、端口号:标实正在计算机上运行的进程,要求不同的进程有不同的端口号
* > 系统端口号:0~1023,应用端口号:1023~49151,私有端口号:49152~65535
* 8、端口号与IP地址的组合得出一个网络套接字:Socket
*
* */
public class InetAddressTest {
public static void main(String[] args) {
try {
InetAddress inet1 = InetAddress.getByName("192.168.10.1");//通过IP地址
System.out.println(inet1);
InetAddress inet2 = InetAddress.getByName("www.baidu.com");//通过域名
System.out.println(inet2);
//getHostName():获取主机名
System.out.println(inet2.getHostName());//www.baidu.com
//getHostAddress():获取IP地址
System.out.println(inet2.getHostAddress());//183.232.231.172
InetAddress inet3 = InetAddress.getByName("127.0.0.1");//本机地址
System.out.println(inet3);
InetAddress localHost = InetAddress.getLocalHost();//获取本机
System.out.println(localHost);
} catch (UnknownHostException e) {
e.printStackTrace();
}
}
}

# 建立 TCP 连接

1
2
3
4
5
6
7
8
9
10
11
12
13
14
15
16
17
18
19
20
21
22
23
24
25
26
27
28
29
30
31
32
33
34
35
36
37
38
39
40
41
42
43
44
45
46
47
48
49
50
51
52
53
54
55
56
57
58
59
60
61
62
63
64
65
66
67
68
69
70
71
72
73
74
75
76
77
78
79
80
81
82
83
84
85
86
87
88
89
90
91
92
93
94
95
96
97
98
99
100
101
102
103
104
105
106
107
108
109
110
111
112
113
114
115
116
117
118
119
120
121
122
123
124
125
126
127
128
129
130
131
132
133
134
135
136
137
138
139
140
141
142
143
144
145
146
147
148
149
150
151
152
import org.junit.Test;

import java.io.*;
import java.net.InetAddress;
import java.net.ServerSocket;
import java.net.Socket;

/**
* @author DzcGood
* @date 2021/10/13 - 23:31
*/

/*
* 实现TCP的网络编程
* 例子1:客户端发送信息给服务端,服务端将数据显示在控制台上
* 例子2:客户端发送文件给服务端,服务端把文件存储在本地
* 例子3:客户端发送文件给服务端,服务端把文件存储在本地,并返回“发送成功给客户端”
* */
public class TCPTest {
// 例子1:客户端发送信息给服务端,服务端将数据显示在控制台上
//客户端
@Test
public void client() throws IOException {//记得用try-catch-finally,懒得写了。。。。
//1、创建Socket对象,指明服务器端的ip和端口号
InetAddress inet = InetAddress.getByName("127.0.0.1");//这里填写的是服务端的IP
Socket socket = new Socket(inet, 64323);
//2、获取一个输出流,用于输出数据
OutputStream outputStream = socket.getOutputStream();
//3、写出数据,相当于向客户端发送数据
outputStream.write("你好,我是客户端".getBytes());
//4、关闭资源
outputStream.close();//记得关闭资源
socket.close();//记得关闭资源
}

//服务端
@Test
public void server() throws IOException{//记得用try-catch-finally,懒得写了。。。。
//1、创建服务器端的ServerSocket,指明自己的端口号
ServerSocket serverSocket = new ServerSocket(64323);//此处的端口号客户机连接的端口号
//2、调用accept()方法,表示接受来自客户端的socket
Socket socket = serverSocket.accept();//表示接受客户端连接
//3、获取输入流
InputStream inputStream = socket.getInputStream();
// byte[] buffer = new byte[20];
// int len;
// while((len = inputStream.read(buffer)) != -1){
// String s = new String(buffer, 0, len);
// System.out.print(s);
// } //用于处理中文字符会出错
//4、读取输入流的数据
byte[] buffer = new byte[10];
ByteArrayOutputStream baos = new ByteArrayOutputStream();
int len;
while((len = inputStream.read(buffer)) != -1){
//这个流类的write方法会写入自身内部的byte数组
//全部读取完后再toString()这样可以避免出现字节流读取中文字符的乱码问题
baos.write(buffer, 0 , len);
}
//这里调用baos的toString()方法,实际上是调用baos内部的数组的toString()方法
System.out.println(baos.toString());
//5、所有资源都需要关闭
baos.close();
inputStream.close();
socket.close();
serverSocket.close();
}


//例子2:客户端发送文件给服务端,服务端把文件存储在本地
@Test
public void client1() throws IOException{//记得用try-catch-finally
Socket socket = new Socket(InetAddress.getByName("127.0.0.1"),9090);
OutputStream outputStream = socket.getOutputStream();
FileInputStream fis = new FileInputStream("flower.jpg");
byte[] buffer = new byte[1024];
int len;
while((len = fis.read(buffer))!= -1){
outputStream.write(buffer, 0 , len);
}
fis.close();
outputStream.close();
socket.close();
}

@Test
public void server1()throws IOException{//记得try-catch-finally
ServerSocket serverSocket = new ServerSocket(9090);
Socket socket = serverSocket.accept();
InputStream inputStream = socket.getInputStream();
FileOutputStream fos = new FileOutputStream("flower_copy.jpg");
byte[] buffer = new byte[1024];
int len;
while((len = inputStream.read(buffer)) != -1){
fos.write(buffer, 0, len);
}
fos.close();
inputStream.close();
socket.close();
serverSocket.close();
}

//例子3:客户端发送文件给服务端,服务端把文件存储在本地,并返回“发送成功给客户端”

@Test
public void client2() throws IOException{//记得用try-catch-finally
Socket socket = new Socket(InetAddress.getByName("127.0.0.1"),9090);
OutputStream outputStream = socket.getOutputStream();
FileInputStream fis = new FileInputStream("flower.jpg");
byte[] buffer = new byte[1024];
int len;
while((len = fis.read(buffer))!= -1){
outputStream.write(buffer, 0 , len);
}
//关闭数据的输出
socket.shutdownOutput();//********************没有此语句的话,会报错******************
InputStream inputStream = socket.getInputStream();
ByteArrayOutputStream baos = new ByteArrayOutputStream();
buffer = new byte[5];
while((len = inputStream.read(buffer)) != -1){
baos.write(buffer, 0 ,len);
}
System.out.println(baos.toString());
inputStream.close();
baos.close();
fis.close();
outputStream.close();
socket.close();
}

@Test
public void server2()throws IOException{//记得try-catch-finally
ServerSocket serverSocket = new ServerSocket(9090);
Socket socket = serverSocket.accept();
InputStream inputStream = socket.getInputStream();
FileOutputStream fos = new FileOutputStream("flower_copy2.jpg");
byte[] buffer = new byte[1024];
int len;
while((len = inputStream.read(buffer)) != -1){
fos.write(buffer, 0, len);
}
//服务器向客户机发送数据
OutputStream outputStream = socket.getOutputStream();
outputStream.write("照片已收到".getBytes());
outputStream.close();
fos.close();
inputStream.close();
socket.close();
serverSocket.close();
}
}

# UDP 连接

1
2
3
4
5
6
7
8
9
10
11
12
13
14
15
16
17
18
19
20
21
22
23
24
25
26
27
28
29
30
31
32
33
34
35
36
37
38
39
40
41
42
43
44
45
import org.junit.Test;

import java.io.IOException;
import java.net.DatagramPacket;
import java.net.DatagramSocket;
import java.net.InetAddress;
import java.net.InetSocketAddress;
import java.nio.charset.StandardCharsets;

/**
* @author DzcGood
* @date 2021/10/15 - 14:40
*/

/*
* UDP协议的例子
* */
public class UDPTest {
//发送端
@Test
public void sender() throws IOException {
DatagramSocket socket = new DatagramSocket();//不使用参数
String str = "我是UDP方式发送的数据";
byte[] data = str.getBytes();
InetAddress inet = InetAddress.getLocalHost();
//将需要发送的数据封装在datagramPacket
DatagramPacket packet = new DatagramPacket(data, 0 , data.length, inet, 9090);
socket.send(packet);
socket.close();
}

//接收端
@Test
public void receiver() throws IOException{
DatagramSocket socket = new DatagramSocket(9090);//指明端口号
byte[] data = new byte[100];
DatagramPacket packet = new DatagramPacket(data, 0, data.length);
socket.receive(packet);
//packet中的getLength()方法可以返回长度
//getData()返回的其实就是byte[]
System.out.println(new String(packet.getData(), 0, packet.getLength()));
socket.close();
}
}

# URL 网络编程

1
2
3
4
5
6
7
8
9
10
11
12
13
14
15
16
17
18
19
20
21
22
23
24
25
26
27
28
29
30
31
32
33
34
35
36
37
38
39
40
41
42
43
44
45
46
47
48
49
50
51
52
53
54
55
56
57
58
59
60
61
62
63
64
import org.junit.Test;

import java.io.FileOutputStream;
import java.io.IOException;
import java.io.InputStream;
import java.net.HttpURLConnection;
import java.net.MalformedURLException;
import java.net.URL;
import java.net.URLConnection;

/**
* @author DzcGood
* @date 2021/10/15 - 14:59
*/

/*
* URL网络编程
* 1、URL:统一资源定位符,对应着互联网的某一资源地址
* 2、格式:
* http://localhost:8080/examples/flower?uername=Tom&id=1001
* 协议 主机名 端口号 资源地址 参数列表
* */
public class URLTest {
public static void main(String[] args) {
try {
URL url = new URL("http://localhost:8080/examples/flower?uername=Tom&id=1001");
//获取协议
System.out.println(url.getProtocol());//http
//获取主机名
System.out.println(url.getHost());//localhost
//获取端口号
System.out.println(url.getPort());//8080
//获取文件路径
System.out.println(url.getPath());// /examples/flower
//获取URL文件名
System.out.println(url.getFile());// /examples/flower?uername=Tom&id=1001
//获取URL的查询名(即参数)
System.out.println(url.getQuery());//uername=Tom&id=1001
} catch (MalformedURLException e) {
e.printStackTrace();
}
}

//通过URL下载文件
//因为未配置tomcat,此代码暂时无法运行
@Test
public void URLtest1() throws IOException{//记得用try-catch-finally
URL url = new URL("http://localhost:8080/examples/flower.jpg?uername=Tom&id=1001");
HttpURLConnection urlConnection = (HttpURLConnection) url.openConnection();//得到一个URL连接
urlConnection.connect();//连接
InputStream is = urlConnection.getInputStream();//获取输入流
FileOutputStream fileOutputStream = new FileOutputStream("flower_copy_3");
byte[] buffer = new byte[1024];
int len;
while((len = is.read(buffer)) != -1){
fileOutputStream.write(buffer, 0 ,len);
}
//关闭资源
fileOutputStream.close();
is.close();
urlConnection.disconnect();//断开连接
}
}

# 反射

# 反射能做什么

1
2
3
4
5
6
7
8
9
10
11
12
13
14
15
16
17
18
19
20
21
22
23
24
25
26
27
28
29
30
31
32
33
34
35
36
37
38
39
40
41
42
43
44
45
46
47
48
49
50
51
52
53
54
55
56
57
58
59
60
61
62
63
64
65
66
67
68
69
70
71
72
73
74
75
76
77
78
79
80
81
82
83
import org.junit.Test;

import java.io.IOException;
import java.lang.reflect.Constructor;
import java.lang.reflect.Field;
import java.lang.reflect.Method;

/**
* @author DzcGood
* @date 2021/10/16 - 1:47
*
* 1、反射机制与面向对象中的封装性是不是矛盾?如何看待两个技术?
* > 不矛盾。(面试的时候必须这么说hhh)
* > 封装性解决的是建议使用和不建议使用的问题,反射解决的是能不能调用的问题
* 2、通过直接new的方式或反射的方式都可以调用公共的结构,开发中用哪个?
* > 建议:直接new的方式
* > 什么时候使用反射:编译的时候不能确定需要造什么类的对象
* 3、关于java.lang.Class类的理解
* > 类的加载过程:
* 程序在经过javac.exe命令后,会生成一个或多个字节码文件(.class),接着我们使用java.exe命令对某个字节码文件
* 解释运行,相当于将某个字节码文件加载到内存中,此过程就称为类的加载。加载到内存中的类称为运行时类,就作为Class
* 的一个实例。换句话说,Class的实例就对应着一个运行时类
* > 哪些类型可以有Class对象?
* 类,数组,接口,枚举,注解,基本数据类型,void
* 注意:对于数组,只要数组的类型和维度一致,那么Class就是相同的。比如 int[] a = new int[10]; int[] b = new int[100]
*/
public class ReflectionTest {
//反射之前,对于Person的操作
@Test
public void test1(){
//1、创建Person类的对象
Person person = new Person("Tom", 12);
//2、通过对象,调用其内部的属性、方法
person.age = 10;
System.out.println(person.toString());
person.show();
//在Person类外部,不可以通过Person类对象调用其内部私有结构
//比如:name、showNation()以及私有构造器
}

//有了反射之后,对于Person的操作
@Test
public void test2() throws Exception {
//1、通过反射,创建类的对象
Class<Person> personClass = Person.class;
Constructor<Person> constructor = personClass.getConstructor(String.class, int.class);
Person person = constructor.newInstance("Ton", 12);
System.out.println(person.toString());
//2、通过反射,调用对象指定的属性和方法
//调用属性
Field age = personClass.getDeclaredField("age");
age.set(person, 10);
System.out.println(person);
//调用方法
Method show = personClass.getDeclaredMethod("show");
show.invoke(person);
//3、通过反射,调用类的私有结构,如私有属性、私有方法、私有构造器
//调用私有构造器
Constructor<Person> declaredConstructor = personClass.getDeclaredConstructor(String.class);
declaredConstructor.setAccessible(true);
Person person1 = declaredConstructor.newInstance("Jerry");
System.out.println(person1);
//调用私有属性
Field name = personClass.getDeclaredField("name");
name.setAccessible(true);
name.set(person1, "Mike");
System.out.println(person1);
//调用私有方法
Method showNation = personClass.getDeclaredMethod("showNation", String.class);
showNation.setAccessible(true);
//相当于String nation = person1.showNation("中国")
String nation = (String) showNation.invoke(person1, "中国");
}

// 注意:对于数组,只要数组的类型和维度一致,那么Class就是相同的
@Test
public void test3(){
int[] a = new int[100];
int[] b = new int[10];
System.out.println(a.getClass() == b.getClass());//true
}
}

# 获取 Class 实例的四种方式

1
2
3
4
5
6
7
8
9
10
11
12
13
14
15
16
17
18
19
20
21
22
23
24
25
26
27
28
29
30
import org.junit.Test;

/**
* @author DzcGood
* @date 2021/10/16 - 2:44
*/

/*
* 获取Class实例的四种方式
* */
public class ToGetClass {
@Test
public void test1() throws Exception{
//方式一:类名.class
Class<Person> personClass1 = Person.class;
System.out.println(personClass1);//class Person
//方式二:通过运行时类的对象
Person person = new Person();
Class<? extends Person> personClass2 = person.getClass();
//方式三:调用Class的静态方法:forName(String classPath),classPath需要带上包名
Class<?> clazz = Class.forName("Person");
//以下两行代码说明:加载到内存中的运行时类,会缓存一段时间,在此时间内,我们可以通过不同的方式来获取此运行时类
System.out.println(personClass1 == personClass2);//true
System.out.println(personClass1 == clazz);//true
//方式四:使用类的加载器ClassLoader,所在类名.class.getClassLoader
ClassLoader classLoader = ToGetClass.class.getClassLoader();
Class<?> clazz1 = classLoader.loadClass("Person");
}
}

# 类加载器

1
2
3
4
5
6
7
8
9
10
11
12
13
14
15
16
17
18
19
20
21
22
23
24
25
26
27
28
29
30
31
32
33
34
35
36
37
38
39
40
41
42
43
44
45
46
47
48
49
50
51
52
53
54
55
import org.junit.Test;

import java.io.FileInputStream;
import java.io.InputStream;
import java.util.Properties;

/**
* @author DzcGood
* @date 2021/10/16 - 17:11
*/

/*
* 了解类的加载器
* 1、引导类加载器:加载Java核心库,该加载器无法直接获取
* 2、扩展类加载器:加载jre/lib/ext里面的jar包
* 3、系统类加载器:加载自己写的类,是最常用的加载器
* */
public class ClassLoaderTest {
@Test
public void test(){
//对于自定义类,使用系统类加载器进行加载
ClassLoader classLoader = ClassLoaderTest.class.getClassLoader();
System.out.println(classLoader);//sun.misc.Launcher$AppClassLoader@18b4aac2,是系统类加载器
//调用系统加载器的getParent(),获取扩展类加载器
System.out.println(classLoader.getParent());//sun.misc.Launcher$ExtClassLoader@2ff4acd0,是扩展类加载器
//调用扩展类加载器的getParent(),无法获取引导类加载器
//引导类加载器无法直接获取,无法加载自定义类
System.out.println(classLoader.getParent().getParent());//null,因为引导类加载器无法加载
//String是核心类,由引导类加载器加载,所以无法获取
ClassLoader classLoader1 = String.class.getClassLoader();
System.out.println(classLoader1);//null
}

/*
* 使用ClassLoader加载配置文件
* 注意方式一和方式二的文件默认位置
* */
@Test
public void test2() throws Exception{
Properties properties = new Properties();
//此时的文件默认在当前的module下
//读取配置文件的方向一:
// FileInputStream fis = new FileInputStream("jdbc.properties");
// properties.load(fis);
//方法二:
ClassLoader classLoader = ClassLoaderTest.class.getClassLoader();
//此时的文件默认在当前module的src下
InputStream is = classLoader.getResourceAsStream("jdbc1.properties");
properties.load(is);
String user = properties.getProperty("user");
String password = properties.getProperty("password");
System.out.println(user);
System.out.println(password);
}
}

# 创建运行时类的对象

1
import org.junit.Test;import java.util.Random;/** * @author DzcGood * @date 2021/10/16 - 18:51 *//** 通过反射创建运行时类的对象* */public class NewInstanceTest {    @Test    public void test1() throws Exception{//记得用try-catch-finally        Class<Person> personClass = Person.class;        /*        * newInstance():调用此方法,创建运行时类的对象。不鼓励使用。内部调用了Person的空参构造器        * 要想此方法正常地创建运行时类的对象,要求:        * 1、运行时类必须提供空参的构造器        * 2、空参的构造器的访问权限得够,通常设置为public        * 在JavaBean中,要求提供一个public的空参构造器。原因“        * 1、便于通过反射创建运行时类的对象        * 2、便于子类继承此运行时类时,默认调用super()空时,保证父类有此构造器        * */        Person person = personClass.newInstance();        System.out.println(person);    }    //体会反射的动态性    @Test    public void test2() throws Exception{        for (int i=0;i < 100; i++) {            int j = new Random().nextInt(3);//0,1,2            String classPath = "";            switch (j){                case 0:                    classPath = "java.util.Date";                    break;                case 1:                    classPath = "java.lang.Object";                    break;                case 2:                    classPath = "Person";                    break;            }            System.out.println(getInstance(classPath));        }    }    /*    * 创建一个指定类的对象    * classPath:指定类的全类名    * */    public Object getInstance(String classPath) throws Exception{        Class<?> aClass = Class.forName(classPath);        return aClass.newInstance();    }}

# 获取运行时类的完整结构

1
2
3
4
5
6
7
8
9
10
11
12
13
14
15
16
17
18
19
20
21
22
23
24
25
26
27
28
29
30
31
32
33
34
35
36
37
38
39
40
41
42
43
44
45
46
47
48
49
50
51
52
53
54
55
56
57
58
59
60
61
62
63
64
65
66
67
68
69
70
71
72
73
74
75
76
77
78
79
80
81
82
83
84
85
86
87
88
89
90
91
92
93
94
95
96
97
98
99
100
101
102
103
104
105
106
107
108
109
110
111
112
113
114
115
116
117
118
119
120
121
122
123
124
125
126
127
128
129
130
131
132
133
134
135
136
137
138
139
140
141
142
143
144
145
146
147
148
149
150
151
152
153
154
155
156
157
158
159
160
161
162
163
164
165
166
167
168
169
170
171
172
173
174
175
176
177
178
179
180
181
182
183
184
185
186
187
188
189
190
191
192
193
194
195
196
197
198
199
200
201
202
203
204
205
206
207
208
209
210
211
212
213
214
215
import org.junit.Test;

import src1.Person;

import java.lang.annotation.Annotation;
import java.lang.reflect.*;

/**
* @author DzcGood
* @date 2021/10/16 - 19:43
*/

/*
* 获取运行时类的所有结构
* */
public class GetAllElementsTest {
//获取属性
@Test
public void test1(){
Class<Person> personClass = Person.class;
//获取属性结构
//getFields():获取当前运行时类及其所有父类中声明为public的属性
Field[] fields = personClass.getFields();//只能获取权限为public的属性
for (Field field : fields) {
System.out.println(field);
}
System.out.println("/////////////////////////////////////");
//getDeclaredFields():获取当前运行时类中声明的所有属性(不包含父类)
Field[] declaredFields = personClass.getDeclaredFields();
for (Field declaredField : declaredFields) {
System.out.println(declaredField);
}
}

//权限修饰符,数据类型,变量名
@Test
public void test2(){
Class<Person> personClass = Person.class;
//getDeclaredFields():获取当前运行时类中声明的所有属性(不包含父类)
Field[] declaredFields = personClass.getDeclaredFields();
for (Field declaredField : declaredFields) {
//1、权限修饰符,public对应1,private是2,protected是4,default是0
int modifiers = declaredField.getModifiers();
System.out.print(Modifier.toString(modifiers) + "\t");//可以转换为字符串
//2、数据类型
Class<?> type = declaredField.getType();
System.out.print(type.getName() + "\t");
//3、变量名
String name = declaredField.getName();
System.out.println(name);
}
}


//获取方法
@Test
public void test3(){
Class<Person> personClass = Person.class;
//getMethods():获取该运行类及其父类所有声明为public的方法
Method[] methods = personClass.getMethods();
for (Method method : methods) {
System.out.println(method);
}
System.out.println("////////////////////////////////");
//getDeclaredMethods():获取当前类声明的所有方法(不包括父类)
Method[] declaredMethods = personClass.getDeclaredMethods();
for (Method declaredMethod : declaredMethods) {
System.out.println(declaredMethod);
}
}

/*
@Xxxx
权限修饰符 返回值类型 方法名(参数类型1 形参名1, ...) throws XxxException
*/
@Test
public void test4(){
Class<Person> personClass = Person.class;
Method[] declaredMethods = personClass.getDeclaredMethods();
for (Method declaredMethod : declaredMethods) {
//1、获取注解(只能获取Retention.RUNTIME的注解)
Annotation[] annotations = declaredMethod.getAnnotations();
for (Annotation annotation : annotations) {
System.out.println(annotation);
}
//2、权限修饰符
int modifiers = declaredMethod.getModifiers();
System.out.print(Modifier.toString(modifiers) + "\t");
//3、返回值
System.out.print(declaredMethod.getReturnType().getName() + "\t");
//4、方法名
System.out.print(declaredMethod.getName());
//5、形参列表
System.out.print("( ");
Class<?>[] parameterTypes = declaredMethod.getParameterTypes();
if(!(parameterTypes == null || parameterTypes.length == 0)){
//表示有参数
for (int i = 0; i < parameterTypes.length; i++){
System.out.print(parameterTypes[i].getName() + " args_" + i);
if(i < parameterTypes.length -1) System.out.print(", ");
}
}
System.out.print(" )");
//6、抛出的异常
Class<?>[] exceptionTypes = declaredMethod.getExceptionTypes();
if(!(exceptionTypes == null || exceptionTypes.length == 0)){
//有抛出异常
System.out.print("throws ");
for (int i = 0; i < exceptionTypes.length; i++) {
System.out.print(exceptionTypes[i].getName());
if(i != exceptionTypes.length -1){
System.out.print(", ");
}
}
}
}
}

/*
获取构造器结构
*/
@Test
public void test5(){
Class<Person> personClass = Person.class;
//getConstructors():获取当前运行时类中声明为public的构造器(不包含父类)
Constructor<?>[] constructors = personClass.getConstructors();
for (Constructor<?> constructor : constructors) {
System.out.println(constructor);
}
//getDeclaredConstructors():获取当前运行时类中声明的所有构造器(不包含父类)
Constructor<?>[] declaredConstructors = personClass.getDeclaredConstructors();
for (Constructor<?> declaredConstructor : declaredConstructors) {
System.out.println(declaredConstructor);
}
}


/*
* 获取运行时类的父类
* */
@Test
public void test6(){
Class<Person> personClass = Person.class;
Class<? super Person> superclass = personClass.getSuperclass();
System.out.println(superclass);//class src1.Creature
}

/*
* 获取运行时类的带泛型的父类
* */
@Test
public void test7(){
Class<Person> personClass = Person.class;
Type genericSuperclass = personClass.getGenericSuperclass();
System.out.println(genericSuperclass);//src1.Creature<java.lang.String>
}


/*
* 获取运行时类的带泛型的父类的泛型
* */
@Test
public void test8(){
Class<Person> personClass = Person.class;
Type genericSuperclass = personClass.getGenericSuperclass();
//强转
ParameterizedType parameterizedType = (ParameterizedType)genericSuperclass;
//获取泛型类型
Type[] actualTypeArguments = parameterizedType.getActualTypeArguments();
System.out.println(actualTypeArguments[0]);//class java.lang.String
System.out.println(actualTypeArguments[0].getTypeName());//java.lang.String
System.out.println(((Class)(actualTypeArguments[0])).getName());//java.lang.String
}

/*
* 获取运行时类的接口
* */
@Test
public void test9(){
Class<Person> personClass = Person.class;
//返回当前运行时类的接口(不包括父类)
Class<?>[] interfaces = personClass.getInterfaces();
for (Class<?> anInterface : interfaces) {
System.out.println(anInterface);
}
//获取运行时类父类的接口
Class<?>[] interfaces1 = personClass.getSuperclass().getInterfaces();
for (Class<?> aClass : interfaces1) {
System.out.println(aClass);
}
}

/*
* 获取运行时类所在的包
* */
@Test
public void test10(){
Class<Person> personClass = Person.class;
Package aPackage = personClass.getPackage();
System.out.println(aPackage);//package src1
}

/*
* 获取运行时类声明的注解
* */
@Test
public void test11(){
Class<Person> personClass = Person.class;
Annotation[] annotations = personClass.getAnnotations();
for (Annotation annotation : annotations) {
System.out.print(annotation + "\t");//@src1.MyAnnotation(value=[hi])
}
}
}

# 调用运行时类的指定结构

1
2
3
4
5
6
7
8
9
10
11
12
13
14
15
16
17
18
19
20
21
22
23
24
25
26
27
28
29
30
31
32
33
34
35
36
37
38
39
40
41
42
43
44
45
46
47
48
49
50
51
52
53
54
55
56
57
58
59
60
61
62
63
64
65
66
67
68
69
70
71
72
73
74
75
76
77
78
79
80
81
82
83
84
85
86
87
88
89
90
91
92
93
import org.junit.Test;
import src1.Person;

import java.lang.reflect.Constructor;
import java.lang.reflect.Field;
import java.lang.reflect.Method;

/**
* @author DzcGood
* @date 2021/10/18 - 8:39
*/

/*
* 调用运行时类中指定的结构:属性、方法、构造器
* */
public class ReflectionTest1 {
//属性
//不理想,只能获取public
@Test
public void testField() throws Exception{
Class<Person> personClass = Person.class;
//创建运行时类的对象
Person person = personClass.newInstance();
//获取指定的属性:要求获取的属性声明为public
Field id = personClass.getField("id");
//设置当前属性的值
//set():参数1:指明设置哪个对象的属性,参数2:将此属性值设置为多少
id.set(person, 10);
/*
* 获取当前对象属性值
* get():参数1:获取哪个对象的当前属性值
* */
int i = (int)id.get(person);
System.out.println(i);//10
}

/*
* 获取属性的方法2,可以获取所有权限的属性。 开发中使用这种
* */
@Test
public void testField1() throws Exception{//
Class<Person> personClass = Person.class;
Person person = personClass.newInstance();
//获取属性
Field name = personClass.getDeclaredField("name");
//将accessible权限设置为true,保证当前属性是可访问的
name.setAccessible(true);//对于private属性,默认是false,不可访问
//设置属性
name.set(person, "Tom");
//获取属性
System.out.println(name.get(person));//Tom
}

@Test
public void testMethod() throws Exception{
Class<Person> personClass = Person.class;
Person person = personClass.newInstance();
/*
* 1、获取指定的某个方法
* > 参数1:方法名称
* > 参数2:要获取的方法的形参列表
* */
Method showInterest = personClass.getDeclaredMethod("showInterest", String.class, int.class);
//保证当前方法是可访问的
showInterest.setAccessible(true);
//方法调用,invoke():参数1:调用者。 参数2:实参列表
String nation = (String)showInterest.invoke(person, "China", 10);// String showInterest()
System.out.println(nation);
//////////////////////调用静态方法///////////////////////////////
Method showDesc = personClass.getDeclaredMethod("showDesc");
showDesc.setAccessible(true);
Object returnVal = showDesc.invoke(Person.class);//静态方法,调用者是当前类
showDesc.invoke(null);//静态方法,调用者写成null也可以
System.out.println(returnVal);//因为返回值是void,所以returnVal是null
}

/*
* 调用运行时类中指定的构造器
* */
@Test
public void testConstructor() throws Exception{
Class<Person> personClass = Person.class;
/*
* getDeclaredConstructor()参数1:构造器的形参列表
* */
Constructor<Person> constructor = personClass.getDeclaredConstructor(String.class, int.class);
//保证构造器是可访问的
constructor.setAccessible(true);
//创建运行时类的对象
Person tom = constructor.newInstance("Tom", 10);
}
}

# 关于 Class 的理解

程序经过 javac.exe 命令后,会生成一个或多个字节码文件 (.class 结尾)。接着我们使用 java.exe 命令对某个字节码文件进行解释运行,相当于将某个字节码文件加载到内存中。此过程就成为类的加载。加载到内存中的类,我们就成为内存中的类,此运行时类,就作为 Class 类的一个实例。

新建运行时类的对象时,Object obj = clazz.newInstance () 有如下要求:

  • 必须有空参的构造器
  • 权限修饰符的权限要够,通常设置成 public

# 反射的应用:动态代理

# 静态代理

1
2
3
4
5
6
7
8
9
10
11
12
13
14
15
16
17
18
19
20
21
22
23
24
25
26
27
28
29
30
31
32
33
34
35
36
37
38
39
40
41
42
43
/**
* @author DzcGood
* @date 2021/10/18 - 19:19
*/
/*
* 静态代理示例:被代理类和代理类在编译期就已经确定下来了
* */
public class StaticProxyTest {
public static void main(String[] args) {
//创建被代理类的对象
NikeClothFactory nike = new NikeClothFactory();
//创建代理类的对象
ProxyClothFactory proxy = new ProxyClothFactory(nike);
//调用代理类的方法
proxy.produceCloth();
}
}

interface ClothFactory{
void produceCloth();
}

//代理类
class ProxyClothFactory implements ClothFactory{
private ClothFactory factory;//用被代理类的对象进行实例化

public ProxyClothFactory(ClothFactory factory) {
this.factory = factory;
}
@Override
public void produceCloth(){
System.out.println("代理工厂准备一些工作");
factory.produceCloth();
System.out.println("代理工厂做后续工作");
}
}

class NikeClothFactory implements ClothFactory{
@Override
public void produceCloth(){
System.out.println("Nike工厂生产一批运动服");
}
}

# 动态代理

1
2
3
4
5
6
7
8
9
10
11
12
13
14
15
16
17
18
19
20
21
22
23
24
25
26
27
28
29
30
31
32
33
34
35
36
37
38
39
40
41
42
43
44
45
46
47
48
49
50
51
52
53
54
55
56
57
58
59
60
61
62
63
64
65
66
67
68
69
70
71
72
73
74
import java.lang.reflect.InvocationHandler;
import java.lang.reflect.Method;
import java.lang.reflect.Proxy;

/**
* @author DzcGood
* @date 2021/10/18 - 19:26
*/

/*
* 动态代理的示例
* */
public class ProxyTest {
public static void main(String[] args) {
SuperMan superMan = new SuperMan();
//proxyInstance:代理类的对象
Human proxyInstance = (Human)ProxyFactory.getProxyInstance(superMan);
//通过代理类对象调用方法时,会自动调用被代理类中同名的方法
System.out.println(proxyInstance.getBelief());
proxyInstance.eat("麻辣烫");
}
}

interface Human{
String getBelief();
void eat(String food);
}

//被代理类
class SuperMan implements Human{
@Override
public String getBelief(){
return "I believe I can fly";
}

@Override
public void eat(String food){
System.out.println("我喜欢吃" + food);
}
}

/*
* 要想实现动态代理,需要解决的问题?
* 1、如何根据加载到内存中的被代理类,动态地创建一个代理类及其对象?
* 2、当通过代理类的对象调用方法时,如何动态地调用被代理类中的同名方法?
* */

class ProxyFactory{

//调用此方法,返回一个代理类的对象
public static Object getProxyInstance(Object obj){//obj:被代理类的对象
MyInvocationHandler handler = new MyInvocationHandler();
handler.bind(obj);
return Proxy.newProxyInstance(obj.getClass().getClassLoader(), obj.getClass().getInterfaces(), handler);
}
}

class MyInvocationHandler implements InvocationHandler{
private Object obj;//赋值时,需要使用被代理类对象进行赋值
public void bind(Object obj){
this.obj = obj;
}
//当我们通过代理类的对象调用方法a时,就会自动调用如下的方法invoke()
//将被代理类要执行的方法a的功能就声明在invoke()方法中
@Override
public Object invoke(Object proxy, Method method, Object[] args)throws Throwable{
//method:即为代理类对象调用的方法,此方法也就作为了被代理类要调用的方法
//obj:被代理类的对象
Object returnVal = method.invoke(obj, args);
//上述方法的返回值就作为当前类中invoke()方法的返回值
return returnVal;
}
}

# JDK8 新特性

# lambda 表达式

1
2
3
4
5
6
7
8
9
10
11
12
13
14
15
16
17
18
19
20
21
22
23
24
25
26
27
28
29
30
31
32
33
34
35
36
37
38
39
40
41
42
43
44
45
46
47
48
49
50
51
52
53
54
55
56
57
58
59
60
61
62
63
64
65
66
67
68
69
70
71
72
73
74
75
76
77
78
79
80
81
82
83
84
85
86
87
88
89
90
91
92
93
94
95
96
97
98
99
100
101
102
103
104
105
106
107
108
109
110
111
112
113
114
115
116
117
118
119
120
121
122
123
124
import org.junit.Test;

import java.util.Comparator;
import java.util.function.Consumer;

/**
* @author DzcGood
* @date 2021/10/19 - 16:36
* lambda表达式的使用
* 1、举例:(o1, o2) -> Integer.compare(o1,o2);
* 2、格式:
* (形参列表) -> lambda体(其实就是方法体)
* 3、使用:分六种情况介绍
* 4、lambda表达式本质:作为接口的具体实现类的对象。简化了接口的实现过程。如Comparator实现类子类的创建
* 5、要求实现的接口是函数式接口:只有一个方法的接口
*/

public class LambdaTest {
/**
* 语法格式一:无参,无返回值
*/
@Test
public void test1(){
Runnable r1 = new Runnable(){
@Override
public void run(){
System.out.println("I Love You");
}
};
r1.run();
System.out.println("..........................");
Runnable r2 = () -> {System.out.print("I Love You Too, ");
System.out.println("骗你的");};
r2.run();
}

/**
* lambda需要一个参数,但没有返回值
* */
@Test
public void test2() {
//原型
Consumer<String> con = new Consumer<String>() {
@Override
public void accept(String s) {
System.out.println("爱你哦");
}
};
con.accept("sssss");
//lambda表达式形式
Consumer<String> con1 = (String s) -> {
System.out.println("我不爱");
};
}

/**
* 情况三:参数类型可省略,由编译器自动推断
* */
@Test
public void test3(){
//原型
Consumer<Integer> con = new Consumer<Integer>() {
@Override
public void accept(Integer s) {
System.out.println("爱你哦");
}
};
con.accept(123);
//lambda表达式形式
Consumer<String> con1 = s -> {
System.out.println("我不爱");
};
}

/**
* 情况四:只有一个参数时,括号可以省略
* */
@Test
public void test4(){
//原型
Consumer<Integer> con = new Consumer<Integer>() {
@Override
public void accept(Integer s) {
System.out.println("爱你哦");
}
};
con.accept(123);
//lambda表达式形式
Consumer<String> con1 = (s) -> {
System.out.println("我不爱");
};
}

/**
* 情况五:需要两个以上参数,有多条语句,有返回值
* */
@Test
public void test5(){
Comparator<Integer> com1 = new Comparator<Integer>() {
@Override
public int compare(Integer o1, Integer o2) {
return Integer.compare(o1, o2);
}
};
int compare1 = com1.compare(12,21);
System.out.println(compare1);
System.out.println("////////////////////////////");
//lambda表达式
Comparator<Integer> com2 = (o1, o2) -> {
System.out.println(o1);
System.out.println(o2);
return Integer.compare(o1, o2);
};
}

/**
* 情况六:lambda体只有一条语句时,若有Return和大括号,则都可以省略
* */
@Test
public void test6(){
Comparator<Integer> com1 = (o1, o2) -> o1.compareTo(o2);
}
}

# 函数式接口

1
2
3
4
5
6
7
8
9
10
11
12
13
14
15
16
17
18
19
20
21
22
23
24
25
26
27
28
29
30
31
32
33
34
35
36
37
38
39
40
41
42
43
44
45
46
47
48
49
50
51
52
53
54
55
56
57
58
59
60
61
62
63
64
65
66
67
68
69
70
71
72
/**
* 自定义函数式接口
* 说明:lambda表达式是对象,而不是函数,它们必须依附于一类特别的对象类型--函数式接口
* @author DzcGood
* @date 2021/10/19 - 19:09
*/
@FunctionalInterface
public interface MyInterface {
/**
* 函数式接口的示例
* */
void method1();
}

import org.junit.Test;

import java.util.ArrayList;
import java.util.Arrays;
import java.util.List;
import java.util.function.Consumer;
import java.util.function.Predicate;

/**
* Java内置的4大核心函数式接口
* 消费型接口 Consumer<T> void accept(T t)
* 供给型接口 Supplier<T> T get()
* 函数型接口 Function<T, R> R apply(T t)
* 断定型接口 Predicate<T> boolean test(T t)
*
* @author DzcGood
* @date 2021/10/19 - 19:22
*/
public class FunctionalInterfaceTest {
/**
* 测试函数式接口Consumer,所有类似于void accept(T t)的函数都可以用lambda表达式代替
* */
@Test
public void test1(){
//使用lambda表达式创建函数式接口Consumer<Double>的实例
happyTime(500, (o) -> System.out.println("消费" + o + "元"));
}

public void happyTime(double money, Consumer<Double> con){
con.accept(money);
}

/**
* 测试predicate<T>接口
* */
@Test
public void test2(){
List<String> aList = Arrays.asList(new String[]{"hello", "hi", "why"});
//表示如果字符串是"hello",就会被过滤
List<String> list = filterString(aList, s -> !s.equals("hello"));
//输出结果为[hi, why]
System.out.println(list);
}

/**
* 根据给定的规则,过滤list中符合条件的字符串,此规则由Predicate的方法决定
* */
public List<String> filterString(List<String> list, Predicate<String> pre){
ArrayList<String> filterList = new ArrayList<>();
for (String s : list) {
if(pre.test(s)){
filterList.add(s);
}
}
return filterList;
}
}

# 方法引用与构造器引用

# 方法引用

1
2
3
4
5
6
7
8
9
10
11
12
13
14
15
16
17
18
19
20
21
22
23
24
25
26
27
28
29
30
31
32
33
34
35
36
37
38
39
40
41
42
43
44
45
46
47
48
49
50
51
52
53
54
55
56
57
58
59
60
61
62
63
64
65
66
67
68
69
70
71
72
73
74
75
76
77
78
79
80
81
82
83
84
85
86
87
88
89
90
91
92
93
94
95
96
97
98
99
100
101
102
103
104
105
106
107
108
109
110
111
112
113
import org.junit.Test;

import java.util.Comparator;
import java.util.function.BiPredicate;
import java.util.function.Consumer;
import java.util.function.Function;
import java.util.function.Supplier;

/**
* 方法引用的使用:
* 1、使用的情景:当要传递给lambda体的操作已经有实现的方法了,可以使用方法引用。
* 2、方法引用,本质上就是lambda表达式,而lambda表达式作为函数式接口的实例,所以方法引用也是函数式接口
* 3、使用格式: 类(或对象):: 方法名
* > 类 :: 非静态方法
* > 类(对象) :: 静态方法
* > 类 :: 非静态方法 ******
* 4、什么时候使用方法引用?要求?
* > 要求接口中的抽象方法的形参列表和返回值类型与方法引用的方法的形参列表和返回值类型一致(针对情况一和二)
* >
* @author DzcGood
* @date 2021/10/19 - 19:56
*/
public class MethodRefTest {
/**
* 情况一:对象::实例方法
* Consumer中的void accept(T t)
* PrintStream中的void println(T t)
* */
@Test
public void test1(){
Consumer<String> con1 = str -> System.out.println(str);
con1.accept("hello");
System.out.println("................");
//这两个lambda表达式效果一致
Consumer<String> con2 = System.out::println;
}

/**
* Supplier的 T get()
* Employee中的String getName()
* */
@Test
public void test2(){
//lambda表达式形式
Employee emp = new Employee("Tom", 10);
Supplier<String> s = () -> emp.getName();
//方法引用形式
Supplier<Integer> s1 = emp::getAge;
}

/**
* 类名 :: 静态方法名
* */
@Test
public void test3(){
//lambda表达式的写法
Comparator<Integer> con = (t1, t2) -> Integer.compare(t1, t2);
//方法引用的写法
Comparator<Double> con1 = Double::compare;
}

/**
* Function中的 R apply(T t)
* Math中的Long round(Double d)
* */
@Test
public void test4(){
//lambda表达式写法
Function<Double, Long> func = (d) -> Math.round(d);
func.apply(12.3);
//方法引用写法
Function<Double, Long> func1 = Math::round;
func1.apply(12.6);
}

/**
* 情况三: 类名 :: 实例方法
* Comparator中的int compare(T t1, T t2)
* String中的boolean t1.equals(t2)
* */
@Test
public void test5(){
//lambda表达式写法
Comparator<String> con1 = (s1, s2) -> s1.compareTo(s2);
//方法引用写法
Comparator<String> con2 = String::compareTo;
////////////////////////////////////////////

/*
* BiPredicate中的 boolean test(T t1, T t2)
* String中的 boolean t1.equals(t2)
* */
//lambda表达式写法
BiPredicate<String, String> bp = (t1, t2) -> t1.equals(t2);
System.out.println(bp.test("hello", "world"));
//方法引用写法
BiPredicate<String, String> bp2 = String::equals;
System.out.println(bp2.test("hello", "hello"));
}

/**
* Employee中的String getName()
* Function中的 R apply(T t)
* */
@Test
public void test6(){
//lambda表达式写法
Function<Employee, String> func = (e) -> e.getName();
//方法引用写法
Function<Employee, String> func1 = Employee::getName;
}
}

# 构造器引用和数组引用

1
2
3
4
5
6
7
8
9
10
11
12
13
14
15
16
17
18
19
20
21
22
23
24
25
26
27
28
29
30
31
32
33
34
35
36
37
38
39
40
41
42
43
44
45
46
47
48
49
50
51
52
53
54
55
56
57
58
59
60
61
62
63
import org.junit.Test;

import java.util.function.BiFunction;
import java.util.function.Function;
import java.util.function.Supplier;

/**
*
* 一、构造器引用
* 和方法引用类似,函数式接口的抽象方法的形参列表和构造器的形参列表一致,抽象方法的返回值就是构造器的返回值
* 二、数组引用
* 把数组看成一个类,那么数组引用就是构造器引用了
*
* @author DzcGood
* @date 2021/10/20 - 1:12
*/
public class ConstructorRef {
/**
* 构造器引用
* Supplier中的 T get()
* */
@Test
public void test1(){
//lambda表达式
Supplier<Employee> supplier = () -> new Employee();
//构造器引用
Supplier<Employee> supplier1 = Employee::new;
}

/**
* Function中的T apply(T t)
* */
@Test
public void test2(){
//lambda表达式
Function<Integer, Employee> fun1 = (age) -> new Employee(age);
//构造器引用
Function<Integer, Employee> fun2 = Employee::new;
}

/**
* BiFunction的 R apply(T t, U u)
* */
@Test
public void test3(){
//lambda表达式
BiFunction<String, Integer, Employee> func = (str, age) -> new Employee(str, age);
//构造器引用
BiFunction<String, Integer, Employee> func1 = Employee::new;
}

/**
* 数组引用
* */
@Test
public void test4(){
//lambda表达式
Function<Integer, String[]> func = (length) -> new String[length];
//数组引用
Function<Integer, String[]> func1 = String[]::new;
}
}

# String API

1
2
3
4
5
6
7
8
9
10
11
12
13
14
15
16
17
18
19
20
21
22
23
24
25
26
27
28
29
30
31
32
33
34
35
36
37
38
39
40
41
42
43
44
45
46
47
48
49
50
51
52
53
54
55
56
57
58
59
60
61
62
63
64
65
66
67
68
69
70
71
72
73
74
75
76
77
78
79
80
81
82
83
84
85
86
87
88
89
90
91
92
93
94
95
96
97
98
99
100
101
102
103
104
105
106
107
108
109
110
111
112
113
114
115
116
117
118
119
120
121
122
123
124
125
126
127
128
129
130
131
132
133
134
135
136
137
138
139
140
141
142
143
144
145
146
147
148
149
150
151
152
153
154
155
156
157
158
159
160
161
162
163
164
165
166
167
168
169
170
171
172
173
174
175
176
177
178
179
180
181
182
183
184
185
186
187
188
189
190
191
192
193
194
195
import org.junit.Test;

import java.util.Arrays;
import java.util.List;
import java.util.Optional;
import java.util.stream.Collectors;
import java.util.stream.IntStream;
import java.util.stream.Stream;

/**
* Stream API的使用
* 1、Stream关注的是数据的运算,与CPU打交道
* 集合讲的是数据的存储,与内存打交道
* 2、Stream不会自己存储数据,不会改变源对象,相反,他们会返回一个持有结果的新Stream
* 3、Stream是延迟执行的,这意味着他们会等到需要结果的时候才执行
* 4、操作步骤
* > 创建Stream
* > 一系列的中间操作
* > 终止操作(一旦执行终止操作,就会开始执行中间操作并产生结果),之后,就不能再被使用
* @author DzcGood
* @date 2021/10/20 - 20:45
*/
public class StreamTest {
/**
* 创建Stream实例的方法一:通过集合
* */
@Test
public void test1(){
List<String> list = Arrays.asList("hello", "hi", "why");
// default Stream<E> stream():返回一个顺序流
Stream<String> stream = list.stream();
// default Stream<E> parallelStream():返回一个并行流
Stream<String> stringStream = list.parallelStream();
}

/**
* 创建Stream实例的方法二:通过数组
* */
@Test
public void test2(){
//调用static <T> Stream<T> Arrays.stream(T[] array):返回一个流
IntStream stream = Arrays.stream(new int[]{123, 4, 54, 232, 6});

}

/**
* 创建Stream实例的方法三:通过Stream.of()
* */
@Test
public void test3(){
Stream<Integer> integerStream = Stream.of(1, 2, 3, 4, 5);
}

/**
* 创建Stream实例的方法四:通过Stream.iterate() 和 Stream.generate()
* */
@Test
public void test4(){
//迭代
//public static <T> Stream<T> iterate(final T seed, final UnaryOperator<T> f)
//遍历前10个偶数
Stream.iterate(0, t -> t + 2).limit(10).forEach(System.out::println);
//生成
//public static <T> Stream<T> generate(Supplier<T> s)
//产生十个随机数
Stream.generate(Math::random).limit(10).forEach(System.out::println);
}


//接下来介绍中间操作


/**
* Stream中间操作一:筛选与切片
* */
@Test
public void test5(){
/*
* filter(Predicate p):接受lambda,从流中删除一些元素
* */
List<String> list = Arrays.asList("hello", "hi", "why", "world", "but", "hello");
Stream<String> stream = list.stream();
//实例:删除流中字符串hi
stream.filter(e -> !e.equals("hi")).forEach(System.out::println);
/*
* limit(n) 截断流,使元素不超过给定数量
* */
//因为stream已经执行终止操作,所以得重新造一个
//筛选出前三条数据
list.stream().limit(3).forEach(System.out::println);
/*
* skip(n) 跳过前n个元素,若元素个数不足n,则返回空流
* */
list.stream().skip(3).forEach(System.out::println);
/*
* distinct() 筛选,通过流所生成的元素的hashCode()和equals()去除重复元素
* */
list.stream().distinct().forEach(System.out::println);
}

/**
* 中间操作之映射
* */
@Test
public void test6(){
//map(Function f):按照f将元素转换成其他形式
List<String> list = Arrays.asList("aa", "bb", "cc", "dd");
//转换成大写
list.stream().map(String::toUpperCase).forEach(System.out::println);
//flatMap(Function f)接受一个函数作为参数,将流中的每个值都换成另一个流,然后把所有流合成一个流

/*
* map和flatMap的区别:
* map相当于List.add
* flatMap相当于List.addAll
* */
}

/**
* 中间操作之排序
* */
@Test
public void test7(){
//sorted() 自然排序
List<Integer> list = Arrays.asList(12, 43, 6, 2, 46, 32);
list.stream().sorted().forEach(System.out::println);
System.out.println(".......................");
//sorted(Comparator com):定制排序
//这里实现从大到小排序
list.stream().sorted((n1, n2) -> -Integer.compare(n1, n2)).forEach(System.out::println);
}

/**
* 终止操作:匹配与查找
* */
@Test
public void test8(){
//boolean allMatch(Predicate p) 检查是否匹配所有元素
// 判断是否所有元素的长度都大于3
List<String> list = Arrays.asList("avf", "dfgr", "a");
Stream<String> stream = list.stream();
boolean b = stream.allMatch(s -> s.length() > 3);
//false
System.out.println(b);
//boolean anyMatch(Predicate p) 检查是否有元素匹配该规则
//true
list.stream().anyMatch(s -> s.length() > 3);
//boolean noneMatch(Predicate p) 如果没有任何元素符合,就返回true
//true
list.stream().noneMatch(s -> s.length() > 5);
//Optional<T> findFirst() 返回第一个元素
Optional<String> first = list.stream().findFirst();
//Optional<T> findAny() 返回任意元素,
Optional<String> any = list.stream().findAny();
//long count()返回流中元素总数
long count = list.stream().count();
//Optional<T> max(Comparator c) 返回最大值
//Optional<T> min(Comparator c) 返回最小值
//forEach(Consumer c) 内部迭代
}

/**
* 终止操作之归约
* */
@Test
public void test9(){
//reduce(T identity BinaryOperator) 将流中元素反复结合起来,得到一个值并返回
//identity是初始值
//计算1-10的自然数之和
List<Integer> list = Arrays.asList(1,2,3,4,5,6,7,8,9,10);
list.stream().reduce(0, Integer::sum);
//reduce(BinaryOperator),返回Optional<T>
//计算list中所有元素之和
Optional<Integer> reduce = list.stream().reduce(Integer::sum);
//也可以这样写
Optional<Integer> reduce1 = list.stream().reduce((n1, n2) -> n1 + n2);
System.out.println(reduce1.toString());
}

/**
* 终止操作之收集
* */
@Test
public void test10(){
//collect(Collector c) :c决定了如何对流执行收集的操作(如收集到List,Set,Map)
List<Integer> list = Arrays.asList(1,2,3,4,5,6,7,8,9,10);
//找到大于5的数字并返回一个List
List<Integer> list1 = list.stream().filter(e -> e > 5).collect(Collectors.toList());
for (Integer integer : list1) {
System.out.print(integer + " ");
}
}
}

# Optional 类

1
2
3
4
5
6
7
8
9
10
11
12
13
14
15
16
17
18
19
20
21
22
23
24
25
26
27
28
29
30
31
32
33
34
35
36
37
38
39
40
41
42
43
44
45
46
47
48
49
50
51
52
53
54
55
56
57
58
59
60
61
62
63
64
import org.junit.Test;

import java.util.Optional;

/**
* Optional类的使用:为了避免程序中空指针异常而创建的类
* 1、常用方法
* > ofNullable(T t)
* > T orElse(T t)
* > T get() 如果Optional内部value不为空,返回该值,否则,抛异常
* > T getOrElse(Supplier<? super T> consumer) 如果有值,就返回值,没有就返回Supplier接口提供的返回值
* > boolean isPresent() 判断是否包含对象
* @author DzcGood
* @date 2021/10/21 - 1:19
*/
public class OptionalTest {
@Test
public void test1(){
//Optional.of(T t) 要求t必须不为null
Optional<Employee> employee = Optional.of(new Employee());
//Optional.empty() 创建一个空的Optional实例
Optional<Object> empty = Optional.empty();
//Optional.ofNullable(T t) 允许t为空
Optional<Object> o = Optional.ofNullable(null);
Employee e = null;
//这里会报空指针
// getEmployeeName(e);
//这里调用使用了Optional的getName(),虽然e是空,但是避免了空指针
System.out.println(OptionalTest.getName(e));
}

/**
* 假设我想获取Employee的姓名,如果不适用Optional,传入null的时候就会空指针异常
* */
public String getEmployeeName(Employee e){
return e.getName();
}


/**
* 假设我想获取Employee的姓名,如果不适用Optional,传入null的时候就会空指针异常
* 按照以往逻辑,可以这样优化
* */
public String getEmployeeName1(Employee e){
if(e == null){
throw new RuntimeException();
}else{
return e.getName();
}
}

/**
* 使用Optional后
* */
public static String getName(Employee e){
//这里的e有可能是null,有可能不是
Optional<Employee> e1 = Optional.ofNullable(e);
// T orElse(T other) 如果Optional内部的value有值就返回value,没有就返回other
//如果e1内部的T是空,就会返回新创建的employee,如果e1不为空,就会返回e1
//这样,获取的Employee对象就一定不是null,可以避免空指针
return e1.orElse(new Employee("我是空值",12)).getName();
}
}

# JDK9-11 新特性

# JDK9 新特性

# 模块化系统

1
2
3
4
5
6
7
8
9
10
11
12
13
14
15
16
17
18
19
20
21
22
23
24
25
26
27
28
29
30
31
32
33
34
35
36
37
38
39
40
41
42
43
44
45
46
47
48
49
50
51
52
53
54
55
import dzc.good.*;

/**
* 如果在一个模块需要用到另外一个模块的类,就需要:
* ①在两个类的src目录下都建立module-info.java文件夹
* ②被引用类module-info.java中,将被使用的类所在的包名exports,格式: exports 包名;
* ③在引用别的模块的类的module-info.java中,格式为:requires 模块名;
* ④最后,在project structures的使用者module下配置依赖dependencies
* @author DzcGood
* @date 2021/10/22 - 16:32
*/
public class ModuleTest {
public static void main(String[] args) {
Person person = new Person("Tom",12);
}
}

//使用者的module-info.java
/**
* @author DzcGood
* @date 2021/10/22 - 16:25
*/
module day27 {
requires day27test; // 格式: requires 被使用模块名
}

//被使用的类声明在模块day27test下
//被使用类的声明(声明在dzc.good包下):
package dzc.good;

/**
* @author DzcGood
* @date 2021/10/22 - 16:40
*/
public class Person {
private String name;
private int age;

public Person() {
}

public Person(String name, int age) {
this.name = name;
this.age = age;
}
}

//被使用模块的module-info.java
/**
* @author DzcGood
* @date 2021/10/22 - 16:25
*/
module day27test {
exports dzc.good; // 格式: exports 被使用类所在的包名
}

# Java 的 REPL 工具:jShell 命令

REPL: 读取、求值、打印、循环

通俗地讲,jShell 命名使得 java 可以像 python 一样成为脚本语言,在命令行下一行一行地执行

JShell 环境下,语句末尾的’;' 是可选的,但推荐还是最好加上,提高代码的可读性

jShell使用举例)

# 接口的私有方法

1
2
3
4
5
6
7
8
9
10
11
12
13
14
15
16
17
18
19
20
21
22
23
24
25
26
27
28
29
30
31
32
33
34
35
36
37
38
39
40
41
42
43
44
45
46
47
48
49
50
51
52
53
54
55
56
57
58
59
60
61
62
63
64
65
66
67
68
69
70
71
/**
* @author DzcGood
* @date 2021/10/22 - 17:18
*/
public interface MyInterface {
//如下的三个方法的权限修饰符都是public

/**
* 接口中的普通方法
* */
void methodAbstract();

/**
* 接口中的静态方法
* */
static void methodStatic(){
System.out.println("我是接口中的静态方法");
}

/**
* 接口中的default方法
* */
default void methodDefault(){
System.out.println("我是接口中的默认方法");
//接口内部可以调用私有接口的方法
this.methodPrivate();
}


/**
* 接口中的私有方法
* */
private void methodPrivate(){
System.out.println("我是接口中的私有方法");
}

}


//下面是接口的实现类
/**
* 此类实现接口MyInterface
* @author DzcGood
* @date 2021/10/22 - 17:22
*/
public class MyInterfaceImp implements MyInterface{
@Override
public void methodAbstract() {

}

@Override
public void methodDefault() {
System.out.println("实现类重写了接口的缺省方法");
}

public static void main(String[] args) {
//接口中的静态方法只能由接口自己调用
MyInterface.methodStatic();
/*
* 实现类不能调用接口的静态方法
* MyInterfaceImp.methodStatic();
* */

MyInterfaceImp myInterfaceImp = new MyInterfaceImp();
//接口的私有方法不能在接口外使用
myInterfaceImp.methodDefault();
}
}

# 钻石操作符的升级

1
2
3
4
5
6
7
8
9
10
11
12
13
14
15
16
17
18
19
20
21
22
23
24
import org.junit.Test;

import java.util.Comparator;

/**
* 新特性:在匿名内部类中也可以使用泛型的自动推断<>
* @author DzcGood
* @date 2021/10/22 - 17:28
*/
public class DiamondOperator {
@Test
public void test(){
//匿名内部类中也可以使用泛型了的自动推断了
//JDK8中,是不允许的
//JDK8中,必须写成Comparator<Object> com = new Comparator<Object>{};
Comparator<Object> com = new Comparator<>() {
@Override
public int compare(Object o1, Object o2) {
return 0;
}
};
}
}

# try 语句优化

1
2
3
4
5
6
7
8
9
10
11
12
13
14
15
16
17
18
19
20
21
22
23
24
25
26
27
28
29
30
31
32
33
34
35
36
37
38
39
40
41
42
43
44
45
46
47
48
49
50
51
52
53
54
55
56
57
58
59
60
61
62
63
64
65
66
67
68
69
70
71
72
73
74
75
76
77
78
import org.junit.Test;

import java.io.IOException;
import java.io.InputStreamReader;

/**
* try语句的升级
* @author DzcGood
* @date 2021/10/22 - 17:37
*/
public class TryTest {
/**
* JDK8之前的情况
* 资源关闭操作在finally中
* */
@Test
public void test1(){
InputStreamReader inputStreamReader = null;
try {
inputStreamReader = new InputStreamReader(System.in);
char[] buf = new char[20];
int len;
if((len = inputStreamReader.read(buf)) != -1){
String str = new String(buf, 0, len);
}
} catch (IOException e) {
e.printStackTrace();
} finally {
if(inputStreamReader != null){
try {
inputStreamReader.close();
} catch (IOException e) {
e.printStackTrace();
}
}
}
}

/**
* jdk8中的资源关闭操作
* 可以把资源的声明写在try(){}的小括号中,小括号内的资源可以自动关闭
* 要求执行后必须关闭的资源必须在try子句的小括号中声明并实例化,否则编译不通过
* */
@Test
public void test2(){
try(InputStreamReader inputStreamReader = new InputStreamReader(System.in);){
inputStreamReader =
char[] buf = new char[20];
int len;
if((len = inputStreamReader.read(buf)) != -1){
String str = new String(buf, 0, len);
}
}catch (IOException e) {
e.printStackTrace();
}
}

/**
* jdk9中的资源关闭
* 可以把资源声明在try外面,然后在try子句中放入资源对象即可
* 要求:try子句中的对象是默认为final的,如果修改它,就会报错
* */
@Test
public void test3(){
InputStreamReader inputStreamReader = new InputStreamReader(System.in);
try(inputStreamReader ){
// reader = null; //会报错,reader默认是final的,不能修改
char[] buf = new char[20];
int len;
if((len = inputStreamReader.read(buf)) != -1){
String str = new String(buf, 0, len);
}
}catch (IOException e) {
e.printStackTrace();
}
}
}

# String 存储结构的变更

1
2
//底层的存储结构由两字节的char[]改成了一字节的byte[]和编码标记,如果是latin类的字符,则一字节表示一个字符,如果是中文类字符,
//则用两个字节表示一个字符

# 集合工厂方法:创建只读集合

1
2
3
4
5
6
7
8
9
10
11
12
13
14
15
16
17
18
19
20
21
22
23
24
25
26
27
28
29
30
31
32
33
34
35
36
37
38
39
40
41
42
43
44
45
import org.junit.Test;

import java.util.*;

/**
* JDK9新特性:集合工厂方法:创建只读集合
* @author DzcGood
* @date 2021/10/22 - 22:03
*/
public class CollectionFactoryTest {
/**
* 在JDK8中创建只读集合的方法,缺点:比较麻烦
* */
@Test
public void test(){
List<String> nameList = new ArrayList<>();
nameList.add("Tom");
nameList.add("Mike");
nameList.add("Jerry");
//创建只读集合
nameList = Collections.unmodifiableList(nameList);
//以下语句会报错,因为nameList是只读集合
// nameList.add("Tommy");
System.out.println(nameList);
}


/**
* JDK9中提供的of()方法,可以快速得到只读集合
* */
@Test
public void test1(){
//此时得到的list是只读的,JDK8可以做到
List<Integer> list = Arrays.asList(1, 2, 3, 4, 5);
//此时得到的list是只读的,JDK9之后才有
List<String> nameList = List.of("Tom", "Mike", "Jerry");
//此时得到的set是只读的,JDK9之后才有
Set<Integer> integers = Set.of(1, 2, 3);
//此时得到的map是只读的,JDK9之后才有
Map<String, Integer> myMap = Map.of("Tom", 12, "Jerry", 13, "Otis", 16);
//以下语句会报错
// nameList.add("hello");
}
}

# InputStream 加强

1
2
3
4
5
6
7
8
9
10
11
12
13
14
15
16
17
18
19
20
21
22
import org.junit.Test;

import java.io.*;

/**
* JDK9中InputStream的新方法:transferTo()
* @author DzcGood
* @date 2021/10/22 - 22:20
*/
public class InputStreamTest {
@Test
public void test(){

try(InputStream is = new FileInputStream("test/hello.txt");
OutputStream os = new FileOutputStream("test/hello1.txt");){
is.transferTo(os);//把输入流中的所有数据直接自动地赋值到输出流中
}catch (IOException e){
e.printStackTrace();
}
}
}

# 增强的 Stream API

1
2
3
4
5
6
7
8
9
10
11
12
13
14
15
16
17
18
19
20
21
22
23
24
25
26
27
28
29
30
31
32
33
34
35
36
37
38
39
40
41
42
43
44
45
46
47
48
49
50
51
52
53
54
55
56
57
58
59
import org.junit.Test;

import java.util.Arrays;
import java.util.List;
import java.util.stream.Stream;

/**
* JDK9新特性:Stream API的加强
* @author DzcGood
* @date 2021/10/22 - 22:40
*/
public class StreamAPITest {
/**
* takeWhile()
* dropWhile()
* */
@Test
public void test(){
List<Integer> list = Arrays.asList(11, 65, 9, 3235, 63, 856);
//takeWhile(Predicate p)会返回从开头开始尽可能多的元素,一旦遇到不符合条件的,即使后面有符合条件的,也会被忽略
list.stream().takeWhile(x -> x < 60).forEach(System.out::println);
//dropWhile(Predicate p):将符合条件的丢弃,直到遇见不符合条件的
list.stream().dropWhile(x -> x < 60).forEach(System.out :: println);
//
}

/**
* ofNullable()
* */
@Test
public void test2(){
//实例化方法一
Stream<Integer> integerStream = Stream.of(1, 2, 3);
//允许某个值是null
Stream<Integer> integerStream1 = Stream.of(1, 2, 3, null);
System.out.println(integerStream1.count());//元素个数被认为是4个
//不允许只有null
// Stream<Integer> integerStream2 = Stream.of(null);
//允许是多个null
Stream<Integer> integerStream3 = Stream.of(null, null, null);
System.out.println(integerStream3.count());//元素个数被认为是3个

//ofNullable() 允许只有null
Stream<Integer> integerStream4 = Stream.ofNullable(null);
System.out.println(integerStream4.count());//元素个数被认为是0个
}

/**
* iterate()
* */
@Test
public void test3(){
//JDK8已经有了
Stream.iterate(0, x -> x + 1).limit(10).forEach(System.out::println);
//JDK9新增:可以自定义终止条件,下面的终止条件是 x < 100
Stream.iterate(0, x -> x < 100, x -> x + 1).forEach(System.out::println);
}
}

# Optional 获取 Stream 的方法

1
2
3
4
5
6
7
8
9
10
11
12
13
14
15
16
17
18
19
20
21
22
23
24
import org.junit.Test;

import java.util.Arrays;
import java.util.List;
import java.util.Optional;
import java.util.stream.Stream;

/**
* JDK9新特性:Optional的stream()方法
* @author DzcGood
* @date 2021/10/22 - 23:37
*/
public class OptionalTest {
@Test
public void test(){
List<String> list = Arrays.asList("Tom", "Jerry", "Otis");
Optional<List<String>> optional = Optional.ofNullable(list);
//stream()方法会返回一个流。
//下面的例子中,会返回一个流,流内只有一个list对象
Stream<List<String>> stream = optional.stream();
stream.flatMap(x -> x.stream()).forEach(System.out::println);
}
}

# Javascript 引擎升级:Nashorn

它为 Java 提供轻量级的 Javascript 运行时,使得 Java 应用能够嵌入 Javascript。它在 JDK11 中就被废弃了。。。。。

# JDK10 新特性

# 局部变量类型推断

1
2
3
4
5
6
7
8
9
10
11
12
13
14
15
16
17
18
19
20
21
22
23
24
25
26
27
28
29
30
31
32
33
34
35
36
37
38
39
40
41
42
43
44
45
46
47
48
49
50
51
52
53
54
55
56
57
58
59
60
61
62
63
64
65
66
67
68
69
70
71
import org.junit.Test;

import java.util.ArrayList;
import java.util.function.Consumer;
import java.util.function.Supplier;

/**
*
* JDK10新特性:局部变量类型推断
* 1、工作原理
* var是根据右边的类型来推断左边的类型的,如果右边的不确定,左边就不能用var
* 推断完成后,会把原来的类型写入字节码文件,var不会出现在字节码文件中
* 2、var不是关键字
* @author DzcGood
* @date 2021/10/23 - 13:36
*/
public class JDK10Test {
@Test
public void test(){
//以前的写法
int num = 10;
//1、声明变量时,根据所赋的值,推断变量的类型
var num1 = 11;
var list = new ArrayList<String>();
list.add("hello");
//2、遍历
for(var str : list){
System.out.println(str + " " + str.getClass());
}
//普通的遍历操作
for (var i = 0; i < 100; i++) {
System.out.println(i);
}
}

/**
* 不能使用类型推断的场景
* */
@Test
public void test1(){
//情况一:没有赋初始值的情况
int num;
// var num;
//情况二:lambda表达式中,左边的接口不能省略
Supplier<Double> sup = () -> Math.random();
//lambda表达式是作为实例赋值给接口的,你现在把接口都省略了,我怎么知道赋值给谁啊。。。
// var sup1 = () -> Math.random();
//情况三:方法引用中,左边的接口不能省略
Consumer<String> con = System.out::println;
// var con1 = System.out::println;
//情况四:数组的静态初始化中
// var arr = {1,2,3,4};
//以下是可以的
var arr = new int[]{1,2,3,4};
}

/**
* 其他不可使用的情况
* */
@Test
public void test3(){
//没有初始化的局部变量声明
// var num = null;
//方法的返回类型:原则是由返回值类型判断return语句是不是合法,而不是根据return推断返回值类型
//方法的参数类型: public void method(var a, var b),理由同上。 如果写成var,什么牛马都可以往里面塞
//构造器的参数类型:理由同上
//属性:属性涉及到构造函数,构造函数就会涉及到参数类型
//catch块
}
}

# 集合新增的 copyOf ():创建只读集合

1
2
3
4
5
6
7
8
9
10
11
12
13
14
15
16
17
18
19
20
21
22
23
24
25
26
27
28
29
30
31
import org.junit.Test;

import java.util.ArrayList;
import java.util.Arrays;
import java.util.List;

/**
* JDK10新特性:集合中新增的copyOf()方法,用于创建只读集合
* @author DzcGood
* @date 2021/10/23 - 14:02
*/
public class CopyOfTest {
@Test
public void test(){
var list = List.of("Java", "Python", "C");
var copy1 = List.copyOf(list);
//true
System.out.println(list == copy1);

var alist = new ArrayList<>();
var copy2 = List.copyOf(alist);
//false
System.out.println(alist == copy2);

//两个代码基本一致,为什么一个为true,一个为false?
//答:如果copyOf()的实际参数是只读的,则没必要再造一个,直接返回实际参数
//如果copyOf()的实际参数不是只读的,就会新造一个。
//所以copy1实际上就是list,而copy2是新造的
}
}

# JDK11 新特性

# String 新增的方法

1
2
3
4
5
6
7
8
9
10
11
12
13
14
15
16
17
18
19
20
21
22
23
24
25
26
27
import org.junit.Test;

/**
* JDK11新特性:String新增的方法
* @author DzcGood
* @date 2021/10/23 - 14:25
*/
public class StringAPITest {
@Test
public void test(){
//isBlank():没有实际的字符的,就返回true(\t,\n,空格,空字符都不算实际字符)
System.out.println(" \t \n ".isBlank());
//strip():去除前后的空格、\t、\n等空白
System.out.println(" hello ".strip());

//stripTrailing():去除尾部空白
//stripLeading():去除首部空白

//repeat(int count):将字符串重复n次
System.out.println("5".repeat(5));
//lines().count():返回行数
//首尾的\n是不被算进去的
String str = "abc\nde\nfg";
System.out.println(str.lines().count());
}
}

# Optional 加强

1
2
3
4
5
6
7
8
9
10
11
12
13
14
15
16
17
18
19
20
21
22
23
24
25
26
27
28
29
30
import org.junit.Test;

import java.util.Optional;

/**
* JDK11新特性:Optional加强
* @author DzcGood
* @date 2021/10/23 - 14:34
*/
public class JDK11OptionalTest {
@Test
public void test(){
/*
* boolean isEmpty() :value为空,就返回true。 注意和isPresent()区别
* ifPresentOrElse(Consumer c, Runnable r) : value存在,执行c,不存在,执行r
* orElseThrow():value存在,就返回value,不存在,就抛异常
* stream() :value为空,就返回一个空stream,value存在,就返回value的stream
* or(Optional o):value存在,就返回对应的optional,value不存在,就返回参数指定的optional
* */
var op = Optional.of("hello");
var op1 = Optional.of("hi");
//因为op里面的value非空,所以返回的是op
Optional<String> op2 = op.or(() -> op1);
//因为op里面的value为空,所以返回的是op1
op = Optional.empty();
op2= op.or(() -> op1);

}
}

# 局部变量类型推断的升级

允许在 var 局部变量上添加注解

1
2
3
4
5
6
7
8
9
10
11
12
13
14
15
16
17
18
19
20
21
import org.junit.Test;

import java.util.function.Consumer;

/**
* @author DzcGood
* @date 2021/10/23 - 14:52
*/
public class JDK11OtherstEST {
@Test
public void test1(){
//在lambda表达式如果想用注解,就不能省略类型
Consumer<String> con = (@Deprecated String t) -> System.out.println(t.toUpperCase());
//以下是错误的,没有加类型
// Consumer<String> con1 = (@Deprecated t) -> System.out.println(t.toUpperCase());
//JDK11中,可以用var这样写
Consumer<String> con2 = (@Deprecated var t) -> System.out.println(t.toUpperCase());

}
}

# HTTP Client

1
2
//HttpClient替换原有的HttpURLConnection
//具体的在JavaWeb学吧。。。

# 更简化的编译运行程序

在 JDK11 之前,执行 Java 程序需要两个步骤:javac classname.java 和 java clasname

现在,只需要一个命令: java classname.java 就可以完成编译和执行的操作了

但是这样做有一些要求:

1、可以调用同一个文件的其它类

2、不能调用别的文件的类

3、只会调用当前源文件中第一个类的 main 方法

总结:这个功能玩玩就可以了。。。。。

# 其他新特性

  • 废弃 Nashorn 引擎(太鸡肋了,刚刚出来没多久就被 Deprecated 了)
  • ZGC:一个并发、基于 region,压缩型的垃圾收集器(反正是一个很牛的东西,以后再学。。。)
  • ……

# 完结撒花

撒花撒花撒花。。。。。。

Next Step ------ MySql


本博客所有文章除特别声明外,均采用 CC BY-SA 4.0 协议 ,转载请注明出处!